
Set up Auto run on publish with Custom deploy
Custom deploy connects your deployment pipeline to Sitepager. After a successful deployment, Sitepager starts the scans you selected for that environment.
You configure the connection in Sitepager, then add one step to your deployment workflow. If you do not manage that workflow yourself, send the setup instructions to whoever does.
Before you start
Section titled “Before you start”Have these ready:
- The scans you want to run, already created in Sitepager. You pick from your existing scans during setup, so create them first if you have not. See Setting Up Your Scans.
- Your staging and/or production URL. Each one is matched against a website you already have in Sitepager.
- Access to your deployment workflow, and permission to add repository or CI secrets. If that is not you, you will hand two values to whoever does.
- A plan that includes Auto run on publish. If yours does not, you will see an option to upgrade your plan.
Connect your site and add your URLs
Section titled “Connect your site and add your URLs”- Go to Settings → Integrations
- Under Connected sites, click Connect a site
- Choose Custom deploy
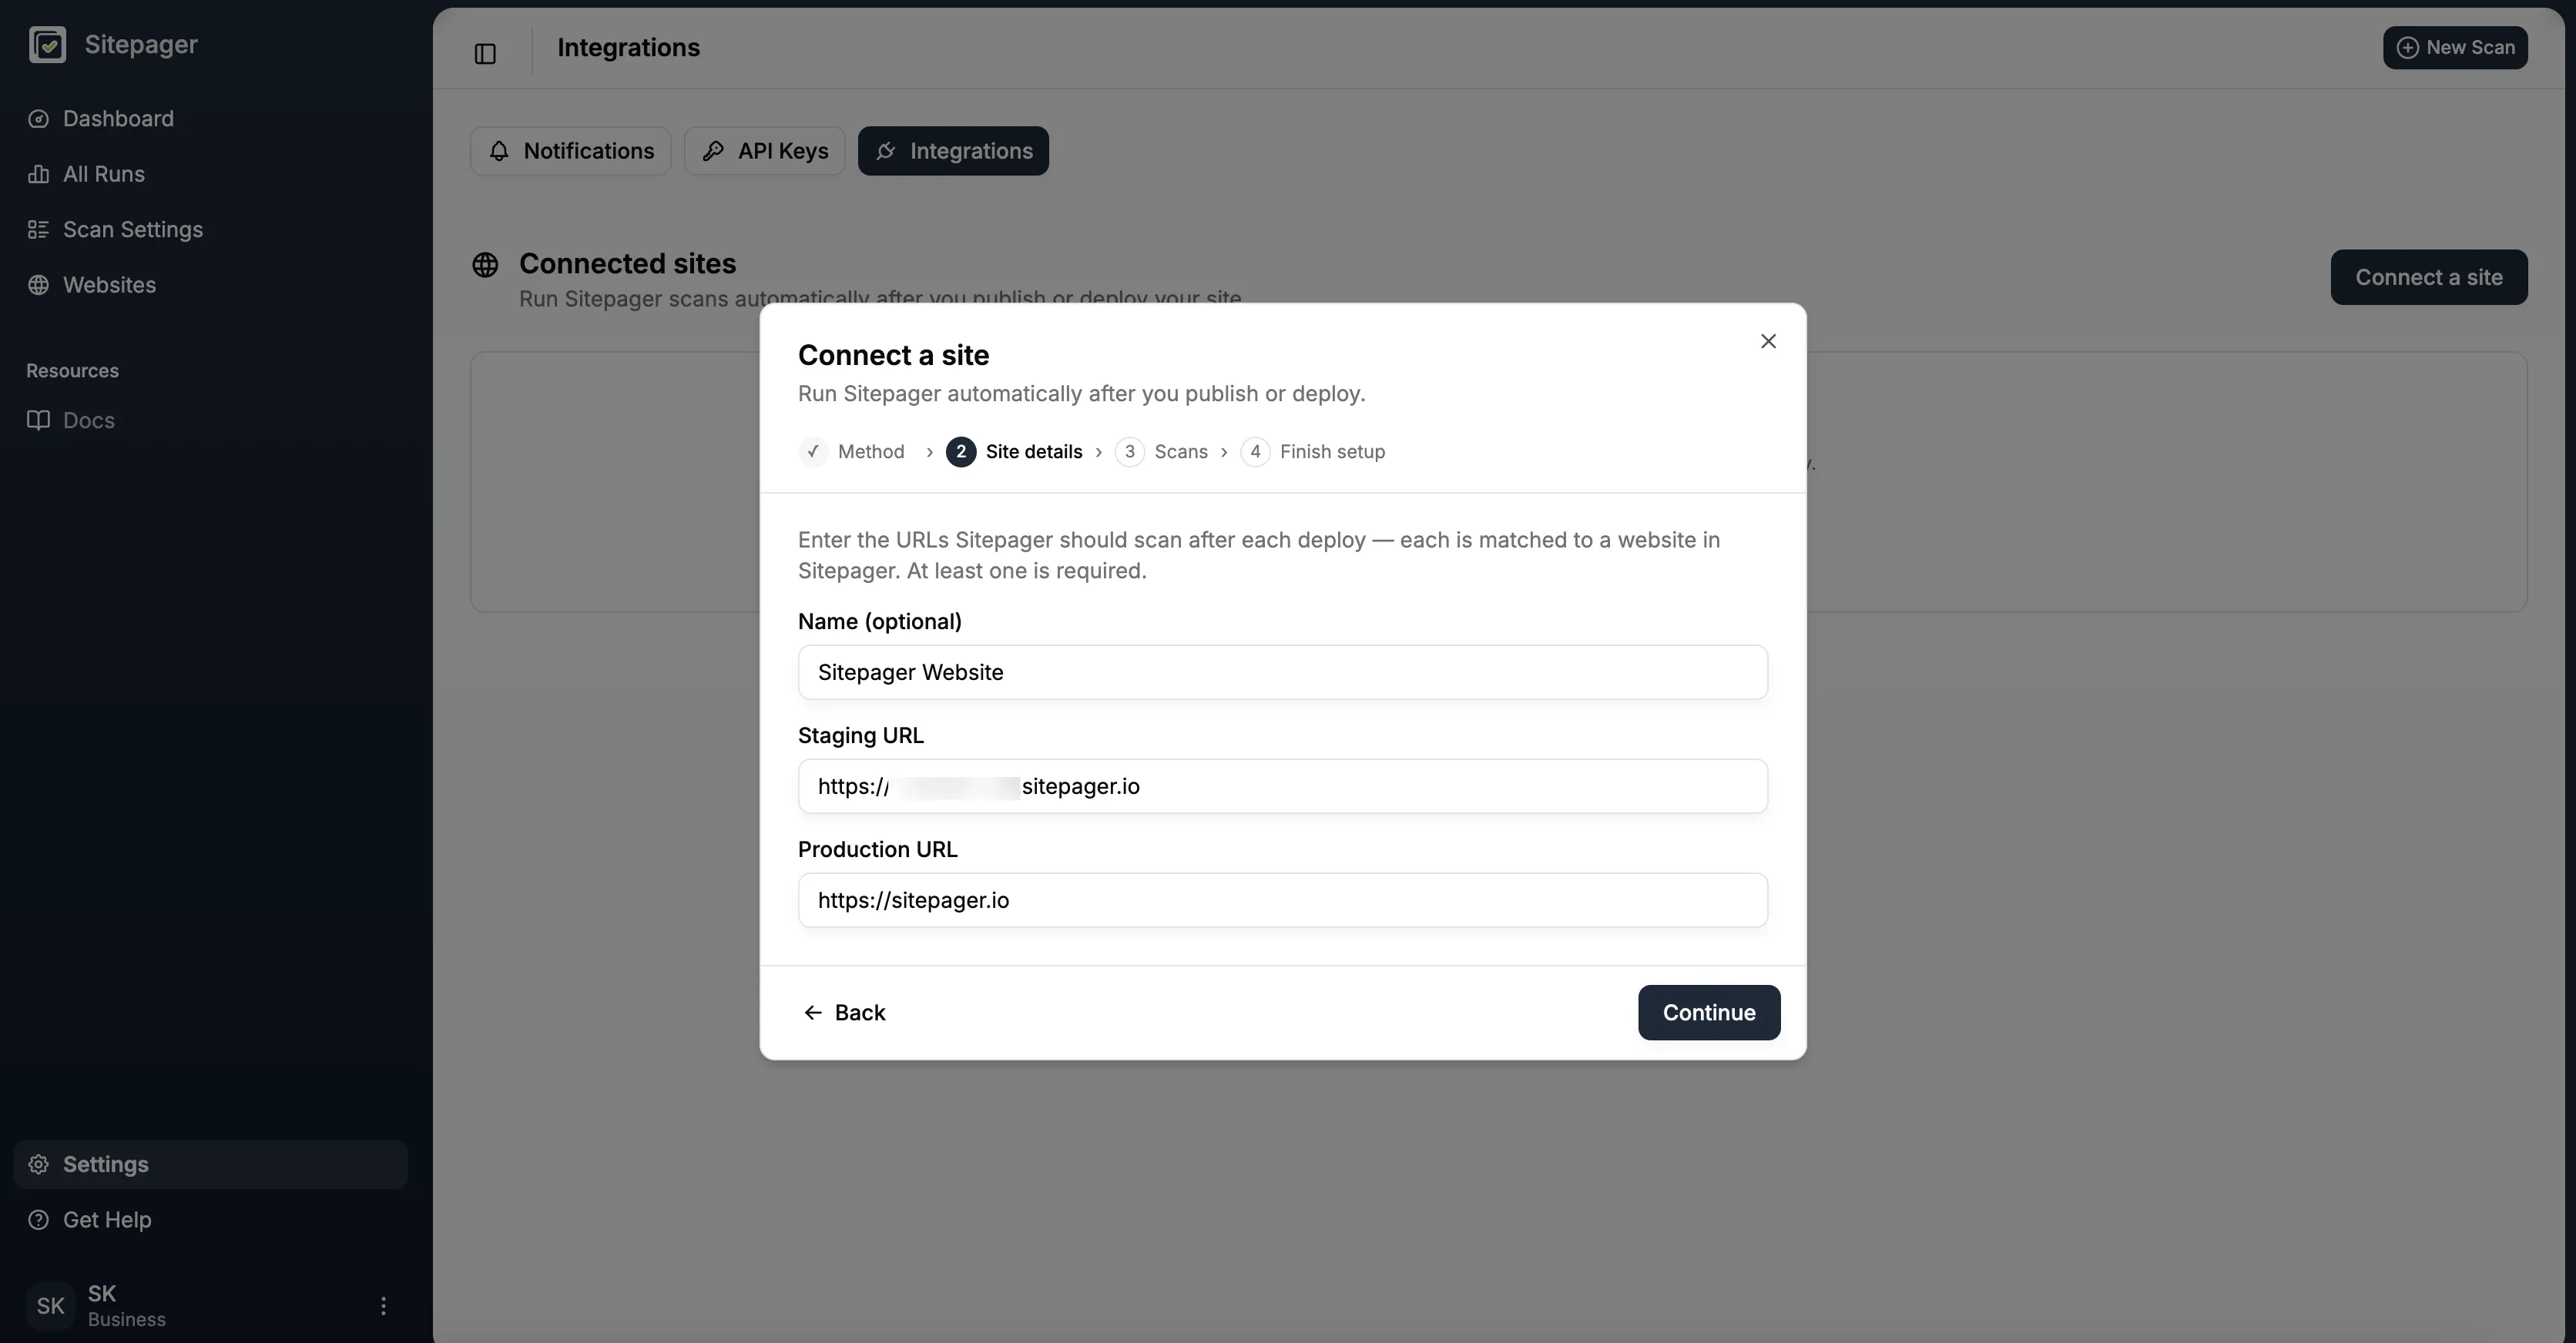
- Enter your Staging URL, your Production URL, or both, then click Continue
You can also give the connection a Name so you can recognise it later. At least one URL is required.
Each URL is matched against a website that already exists in Sitepager. Sitepager does not create a website for a URL it does not recognise.
One connection covers both environments. The request your pipeline sends says which environment it deployed, so staging and production do not need separate connections.
Choose which scans run
Section titled “Choose which scans run”Select the scans you want Sitepager to run automatically for each environment, then finish the setup. Staging and production are configured independently. You can set up one and leave the other alone.
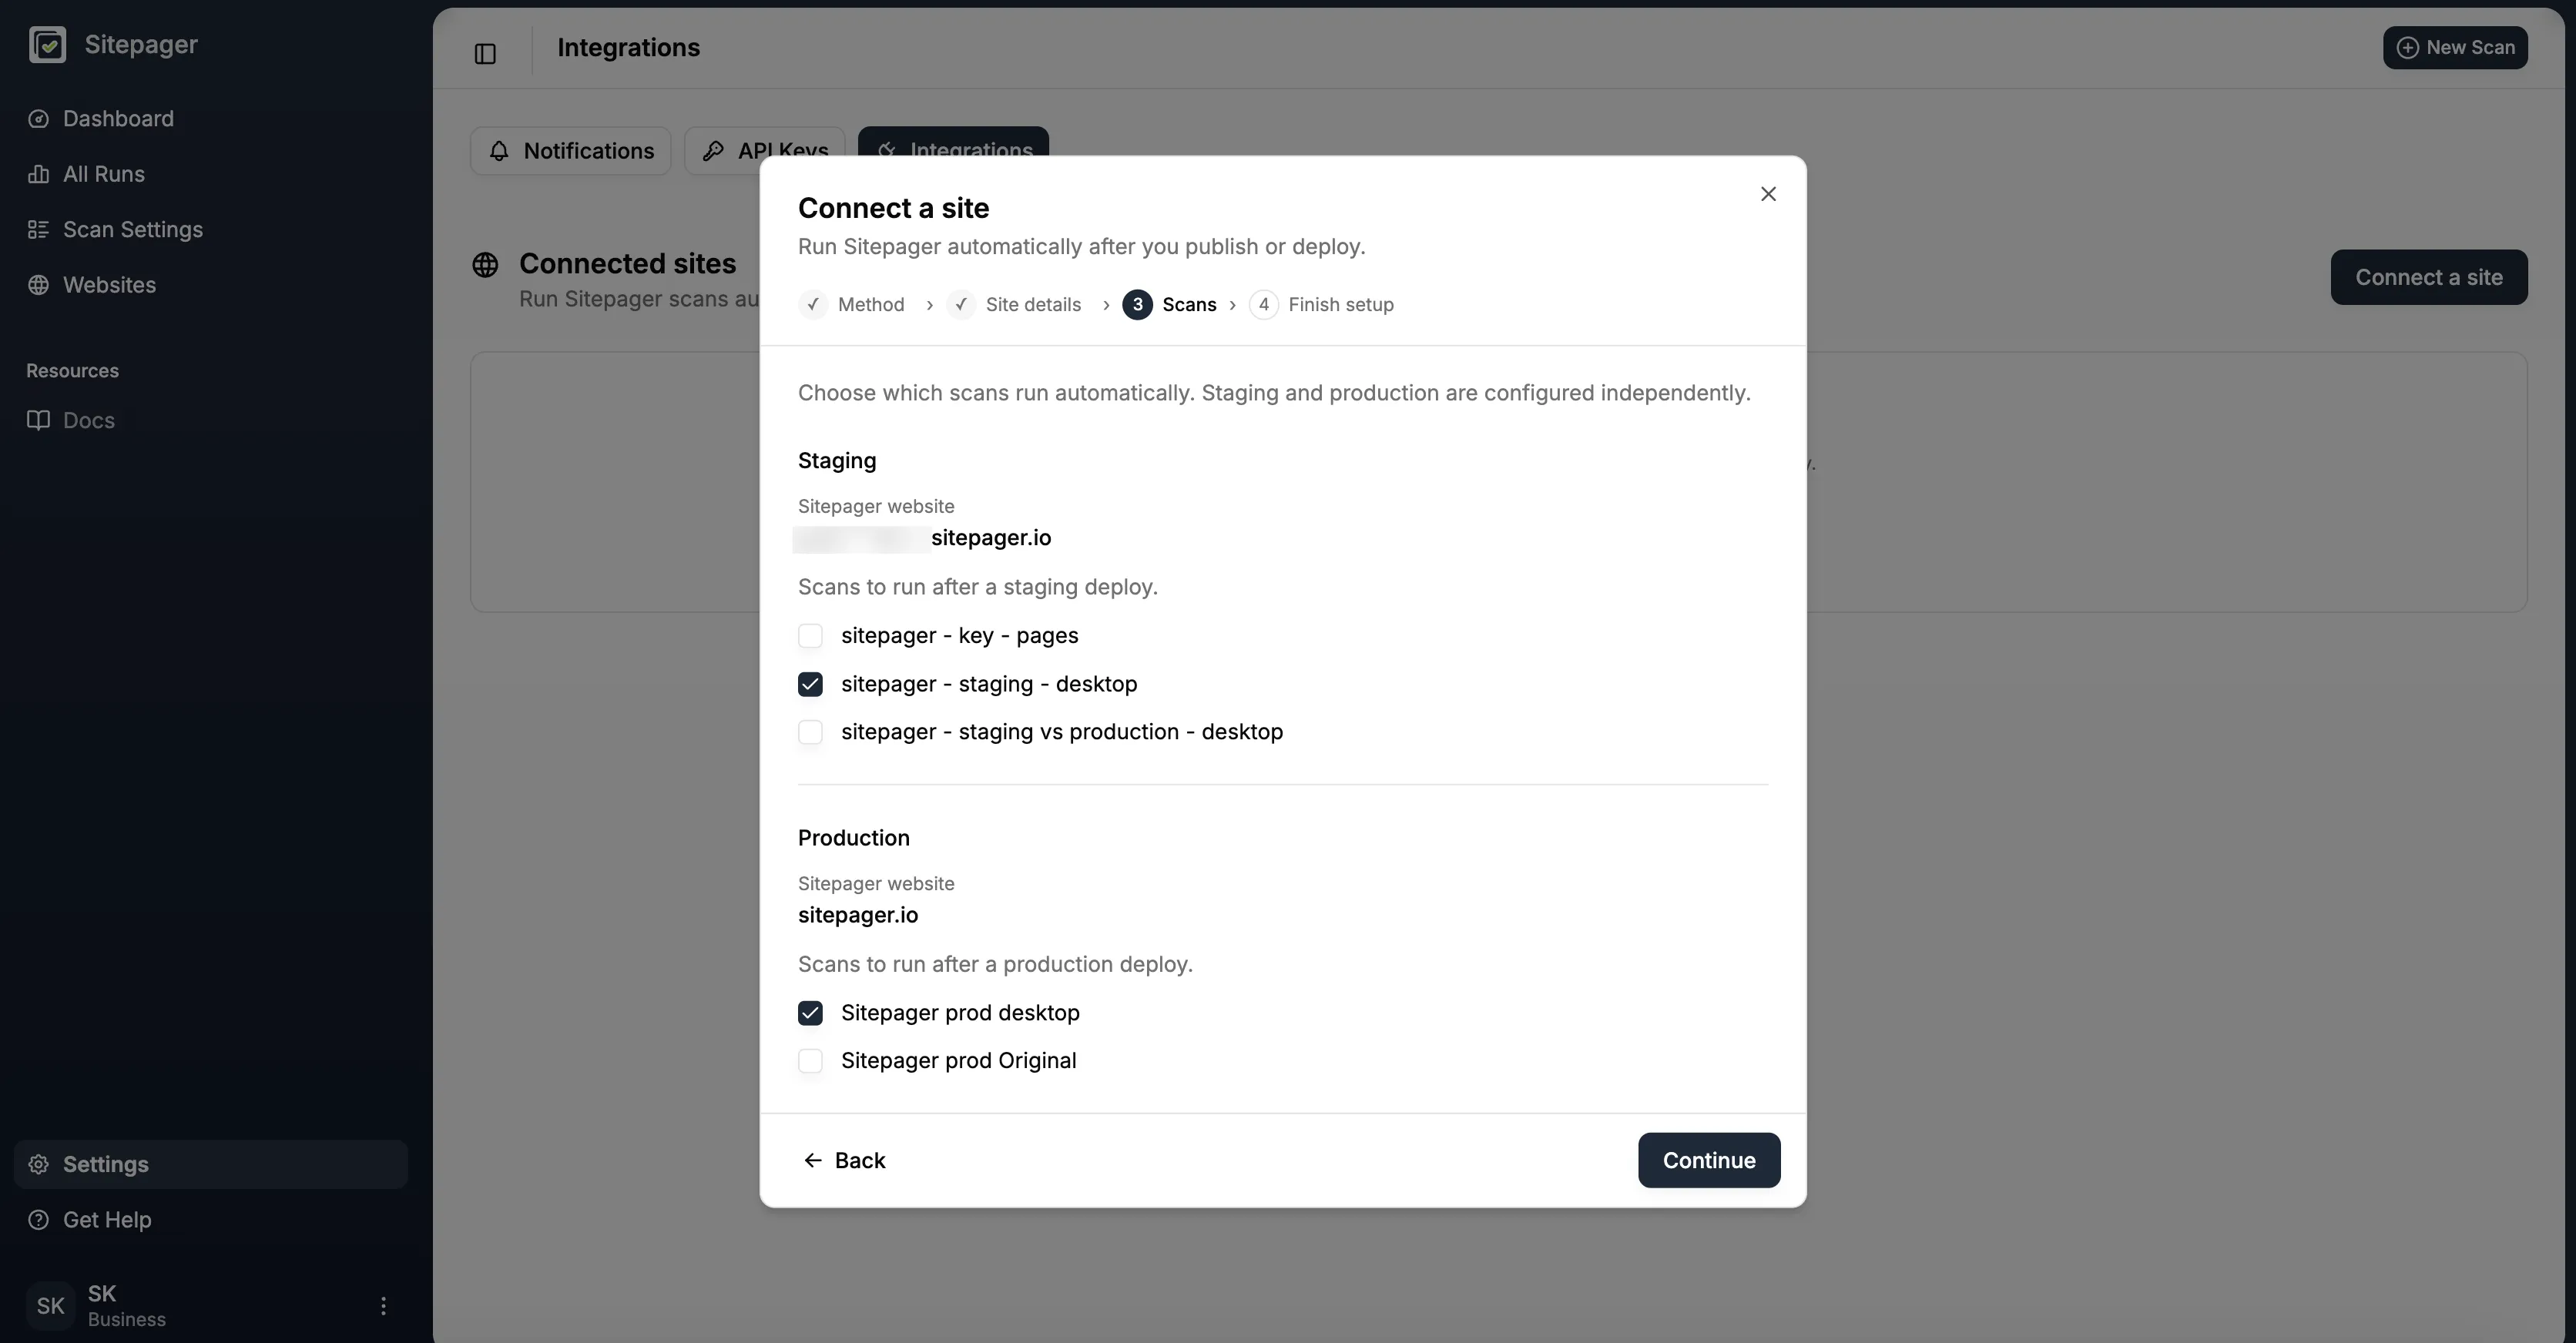
An environment reads Not set up when nothing will run for it, either because no scans are selected or because Sitepager has no matching website for that environment yet.
To add a missing URL, use Add staging URL or Add production URL in Manage scans. To correct a URL, use Edit site details. Your webhook URL, signing secret, other environment, and scan selections stay unchanged, so you do not need to reconnect.
To change your selection later, open Settings → Integrations and click Manage scans on the site. To stop automatic runs altogether, open the … menu on the site and choose Disconnect. Your scans and past results are not affected, and you can reconnect later.
Get your webhook URL and signing secret
Section titled “Get your webhook URL and signing secret”When you finish the setup, Sitepager creates the connection and shows you two values:
- Webhook URL, the address your pipeline sends its request to. It stays the same for the life of the connection.
- Signing secret, used to prove the request came from you.
Copy the signing secret now. It is shown in full only once. After you leave this screen Sitepager shows only its last few characters, so you can check which secret is in use without revealing it.
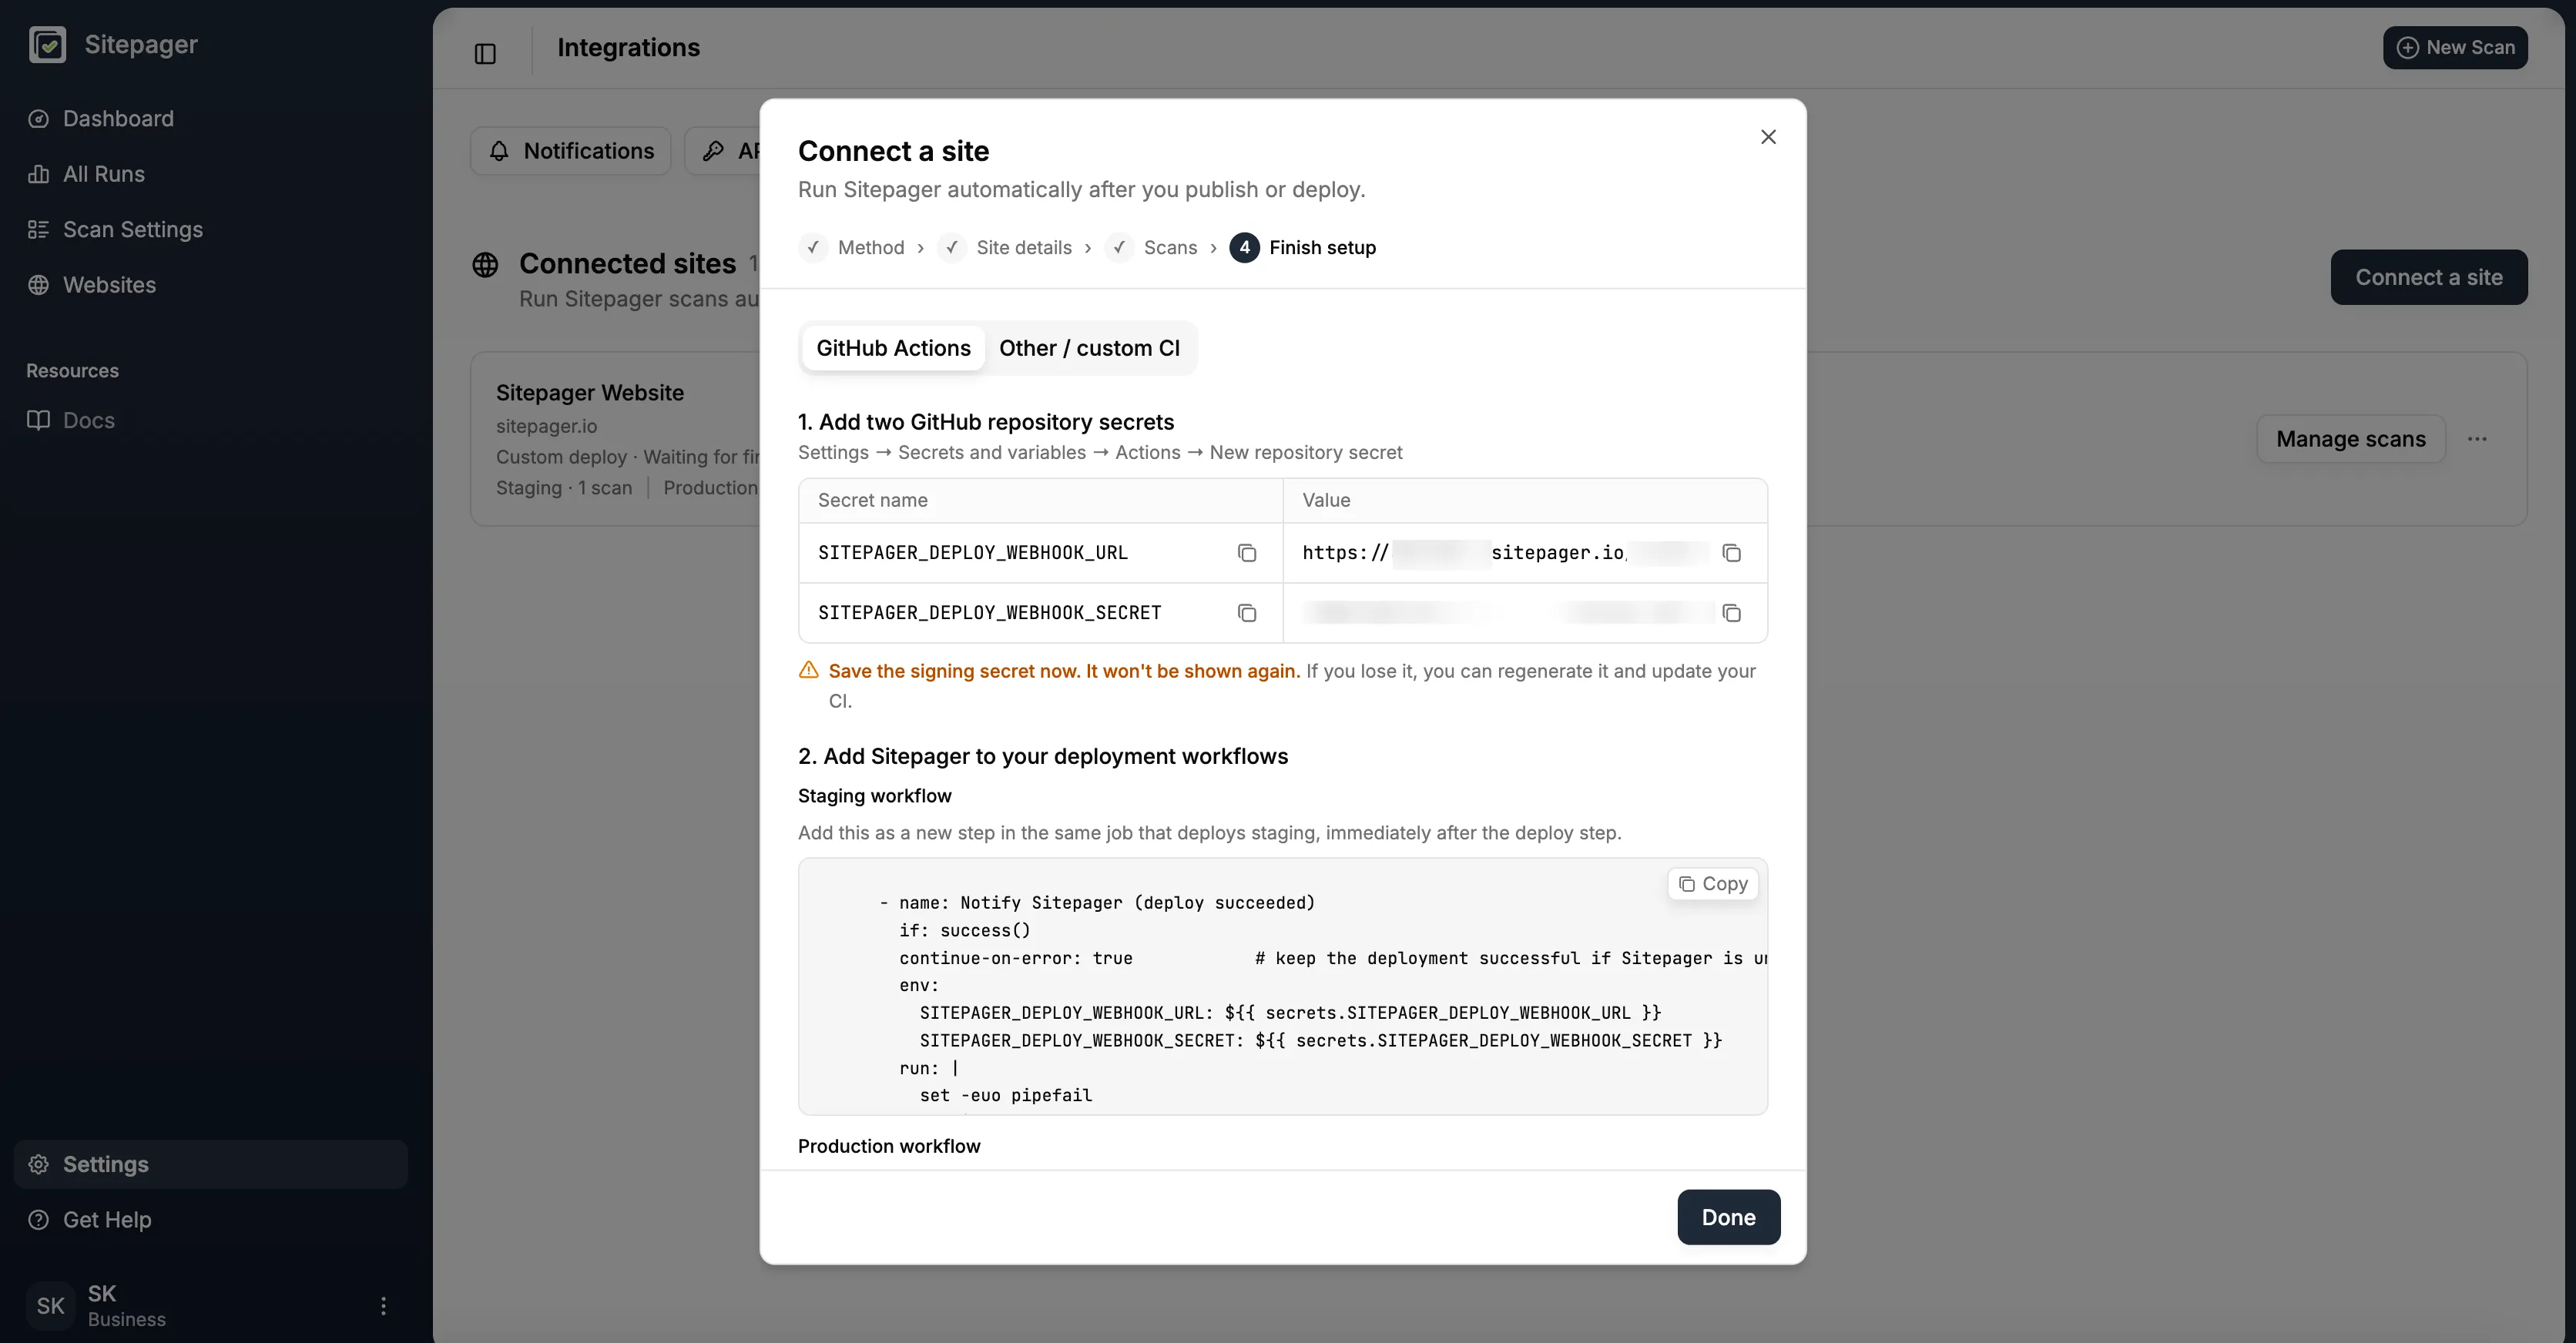
The setup screen opens on GitHub Actions. If you use something else, switch to Other / custom CI for the raw values and request format.
You can reopen the webhook URL and the setup snippets at any time from the … menu on the site, under Setup instructions.
If you lose the signing secret, choose Regenerate secret from the same menu. The new secret replaces the old one immediately, so update it wherever your pipeline stores it. Your webhook URL and your site URLs do not change.
Add Sitepager to your deployment workflow
Section titled “Add Sitepager to your deployment workflow”This is the part that needs access to your deployment pipeline. Everything above happens in Sitepager; everything below happens in your repository.
GitHub Actions
Section titled “GitHub Actions”- In your repository, go to Settings → Secrets and variables → Actions, then click New repository secret
- Add the webhook URL as
SITEPAGER_DEPLOY_WEBHOOK_URL - Add the signing secret as
SITEPAGER_DEPLOY_WEBHOOK_SECRET - Copy the ready-made step Sitepager shows you and paste it into your deployment workflow
Three things decide whether that step works:
- Put it in the same job that deploys your site. The step only runs if the earlier steps in its own job succeeded, so a step pasted into a different job is checking the wrong thing.
- Put it immediately after the deploy step, so it runs once the deployment has actually finished.
- Use the snippet for the right environment. If you deploy staging and production from separate workflows, each one needs its own snippet.
The generated step uses continue-on-error, so a failed Sitepager request does not fail your deployment job.
Using a coding agent?
Section titled “Using a coding agent?”Optional. If you work with a coding agent such as Claude Code, Cursor, or Codex, you can have it add the step for you. Copy the generated snippet from Sitepager and paste it along with this prompt:
Add Sitepager's Auto run on publish step to the deployment workflow forthe environment in the Sitepager snippet I pasted with this prompt. Putit in the same job, immediately after the successful deploy step. Use theexisting repository secrets SITEPAGER_DEPLOY_WEBHOOK_URL andSITEPAGER_DEPLOY_WEBHOOK_SECRET. Do not hardcode either value or changethe existing deployment behavior. Use the pasted Sitepager snippet as thesource of truth. If this repository has multiple deployment workflows andit is not clear which one matches the snippet, ask me before editing.Show me the changes before committing.Paste the snippet, never the signing secret itself. The snippet refers to your secrets by name, so the agent never needs their values, and you should add both secrets in GitHub yourself.
Other / custom CI
Section titled “Other / custom CI”If you do not use GitHub Actions, send the same request from your own pipeline once a deployment has completed successfully.
Request
POST <your webhook URL>Headers
content-type: application/jsonx-sitepager-timestamp: <current time in epoch milliseconds>x-sitepager-signature: hex-encoded HMAC-SHA256 of {timestamp}:{rawBody} using the signing secretSignature
HMAC-SHA256("{timestamp}:{rawBody}", signingSecret)Use the same timestamp value you send in x-sitepager-timestamp, and send the current time in epoch milliseconds. Requests more than five minutes old are rejected.
Body
{ "event": "deploy.succeeded", "environment": "staging", "deploymentId": "<stable id for this deploy attempt>", "finishedAt": "<optional ISO 8601 timestamp>"}environment must be either staging or production, and it decides which scans run.
deploymentId should be a stable ID for the deployment attempt. Retrying the same attempt is treated as the same deployment and does not run your scans twice. A new deployment should use a new ID.
When runs start
Section titled “When runs start”Runs do not start the instant your deployment finishes. Sitepager waits about five minutes, so rapid deployments are grouped together before the selected scans start. Runs usually start about five to ten minutes after the last deployment.
What you see after deployment
Section titled “What you see after deployment”Deploy your site the way you always do. Shortly afterwards, All Runs shows that Sitepager received the deployment, along with the site, the environment, and the scans that are queued.
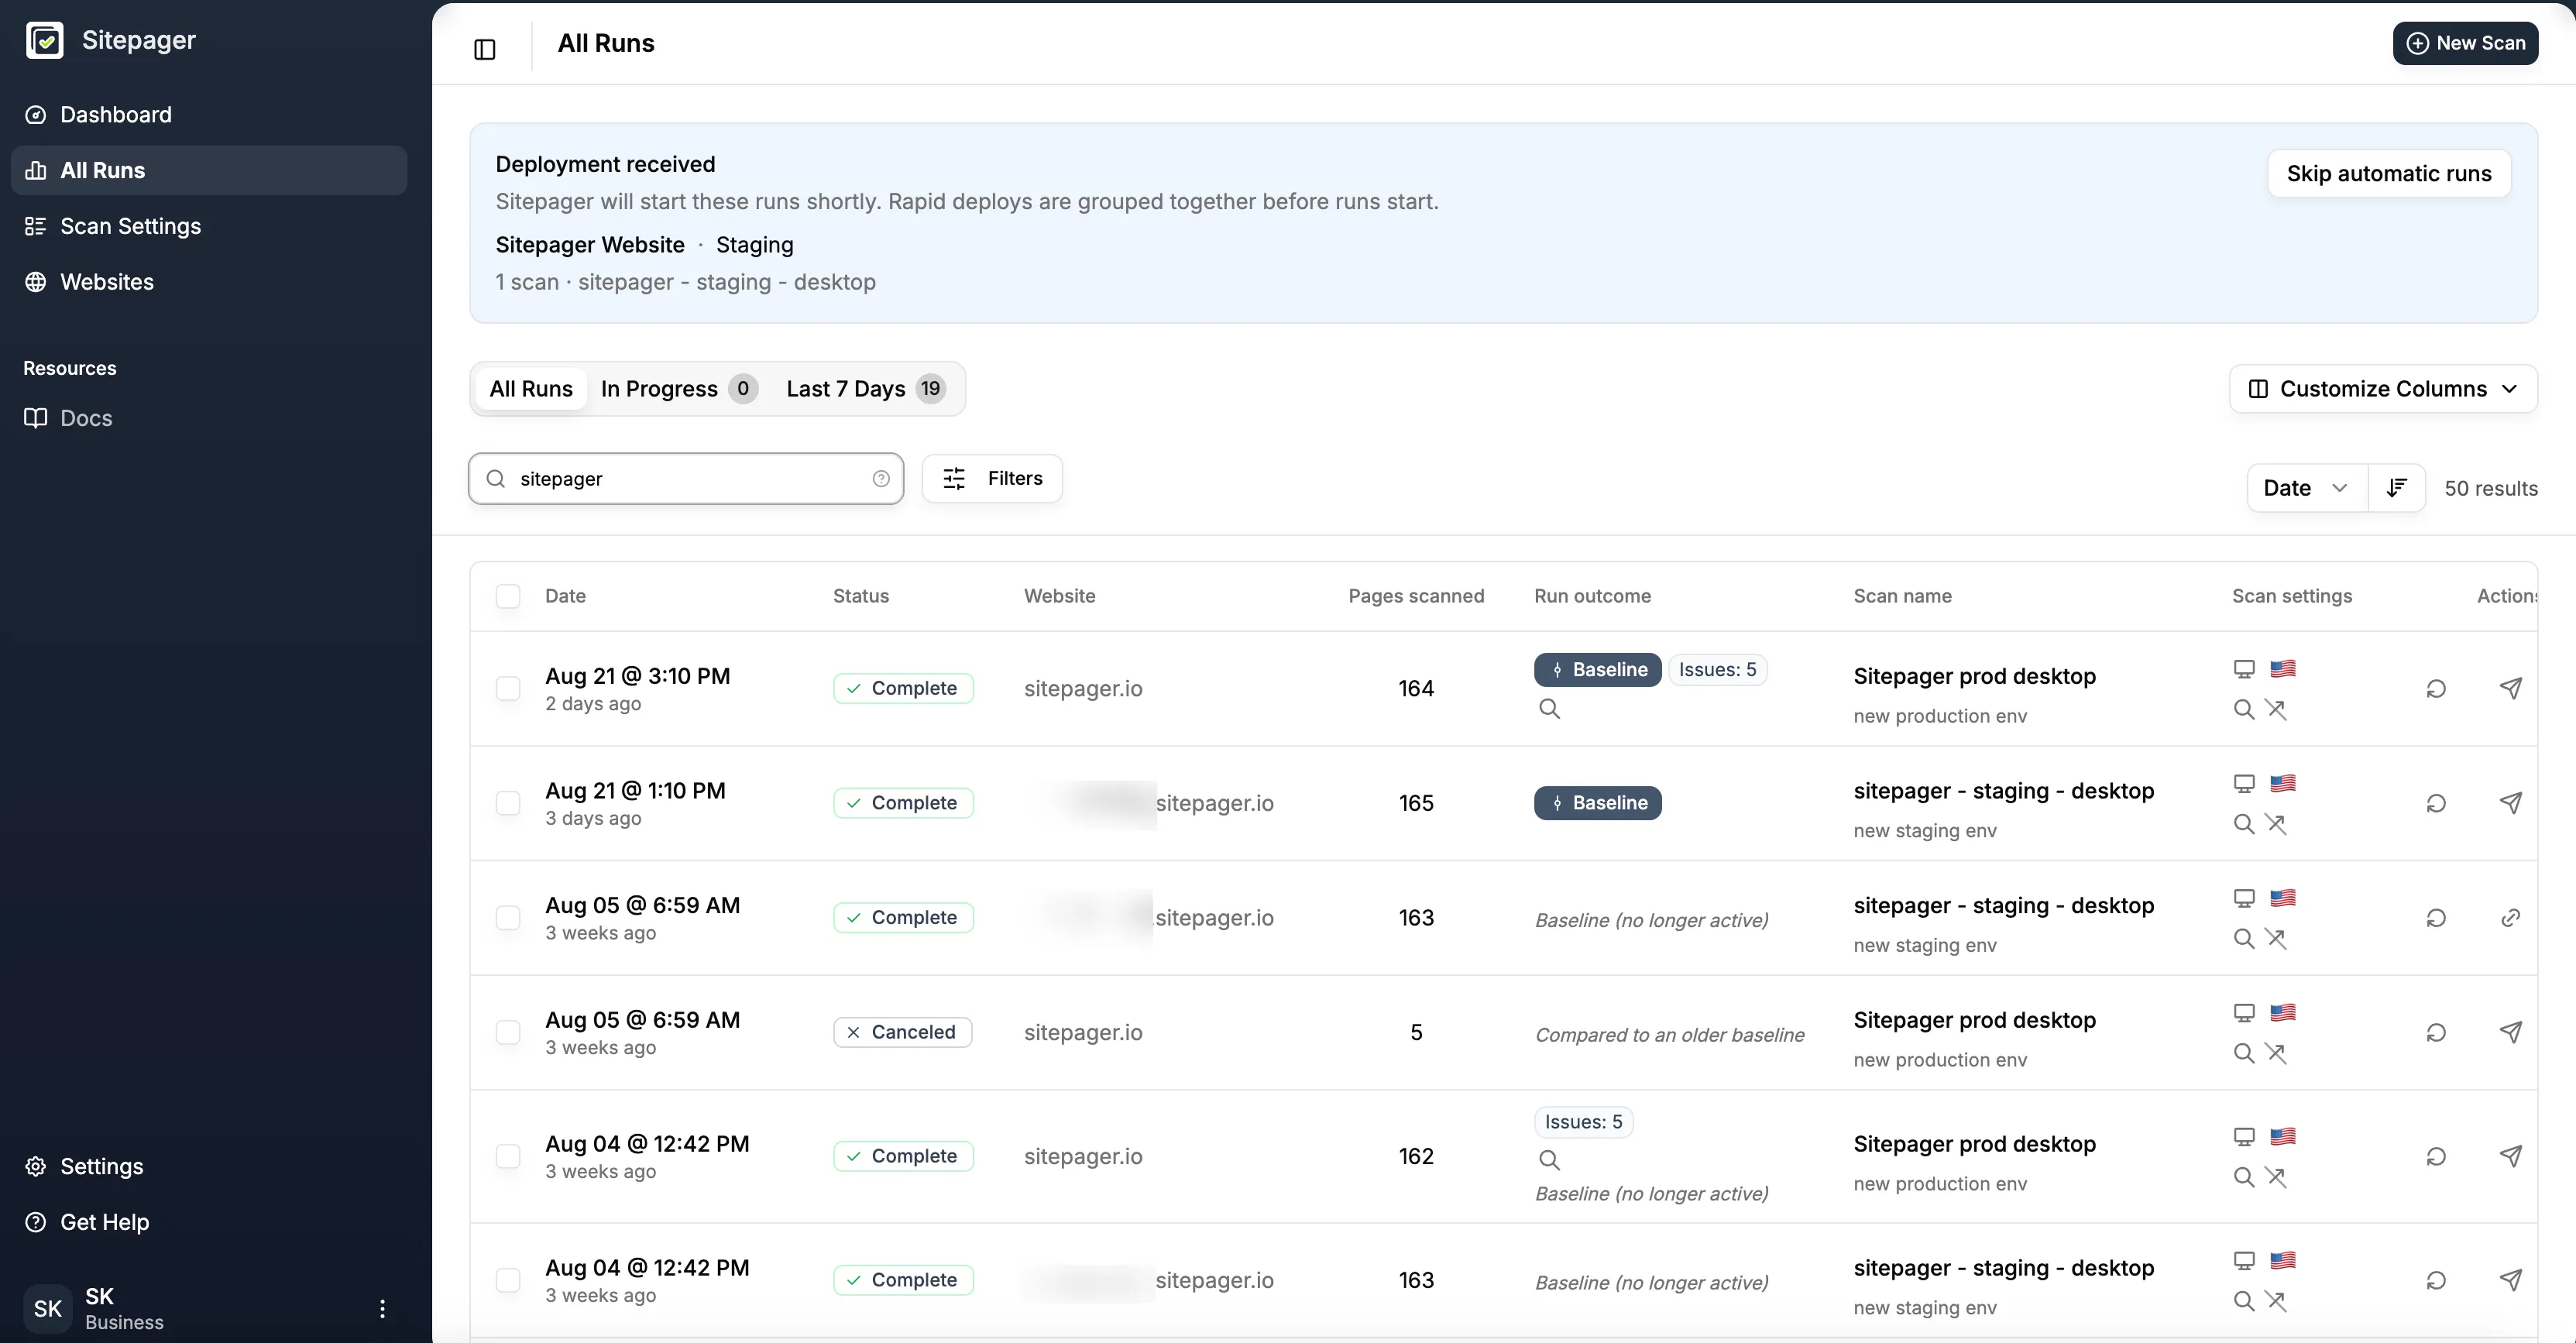
If you do not want this deployment checked, click Skip automatic runs while it is still waiting.
Once the wait is over, the runs start on their own and appear in All Runs like any other run.
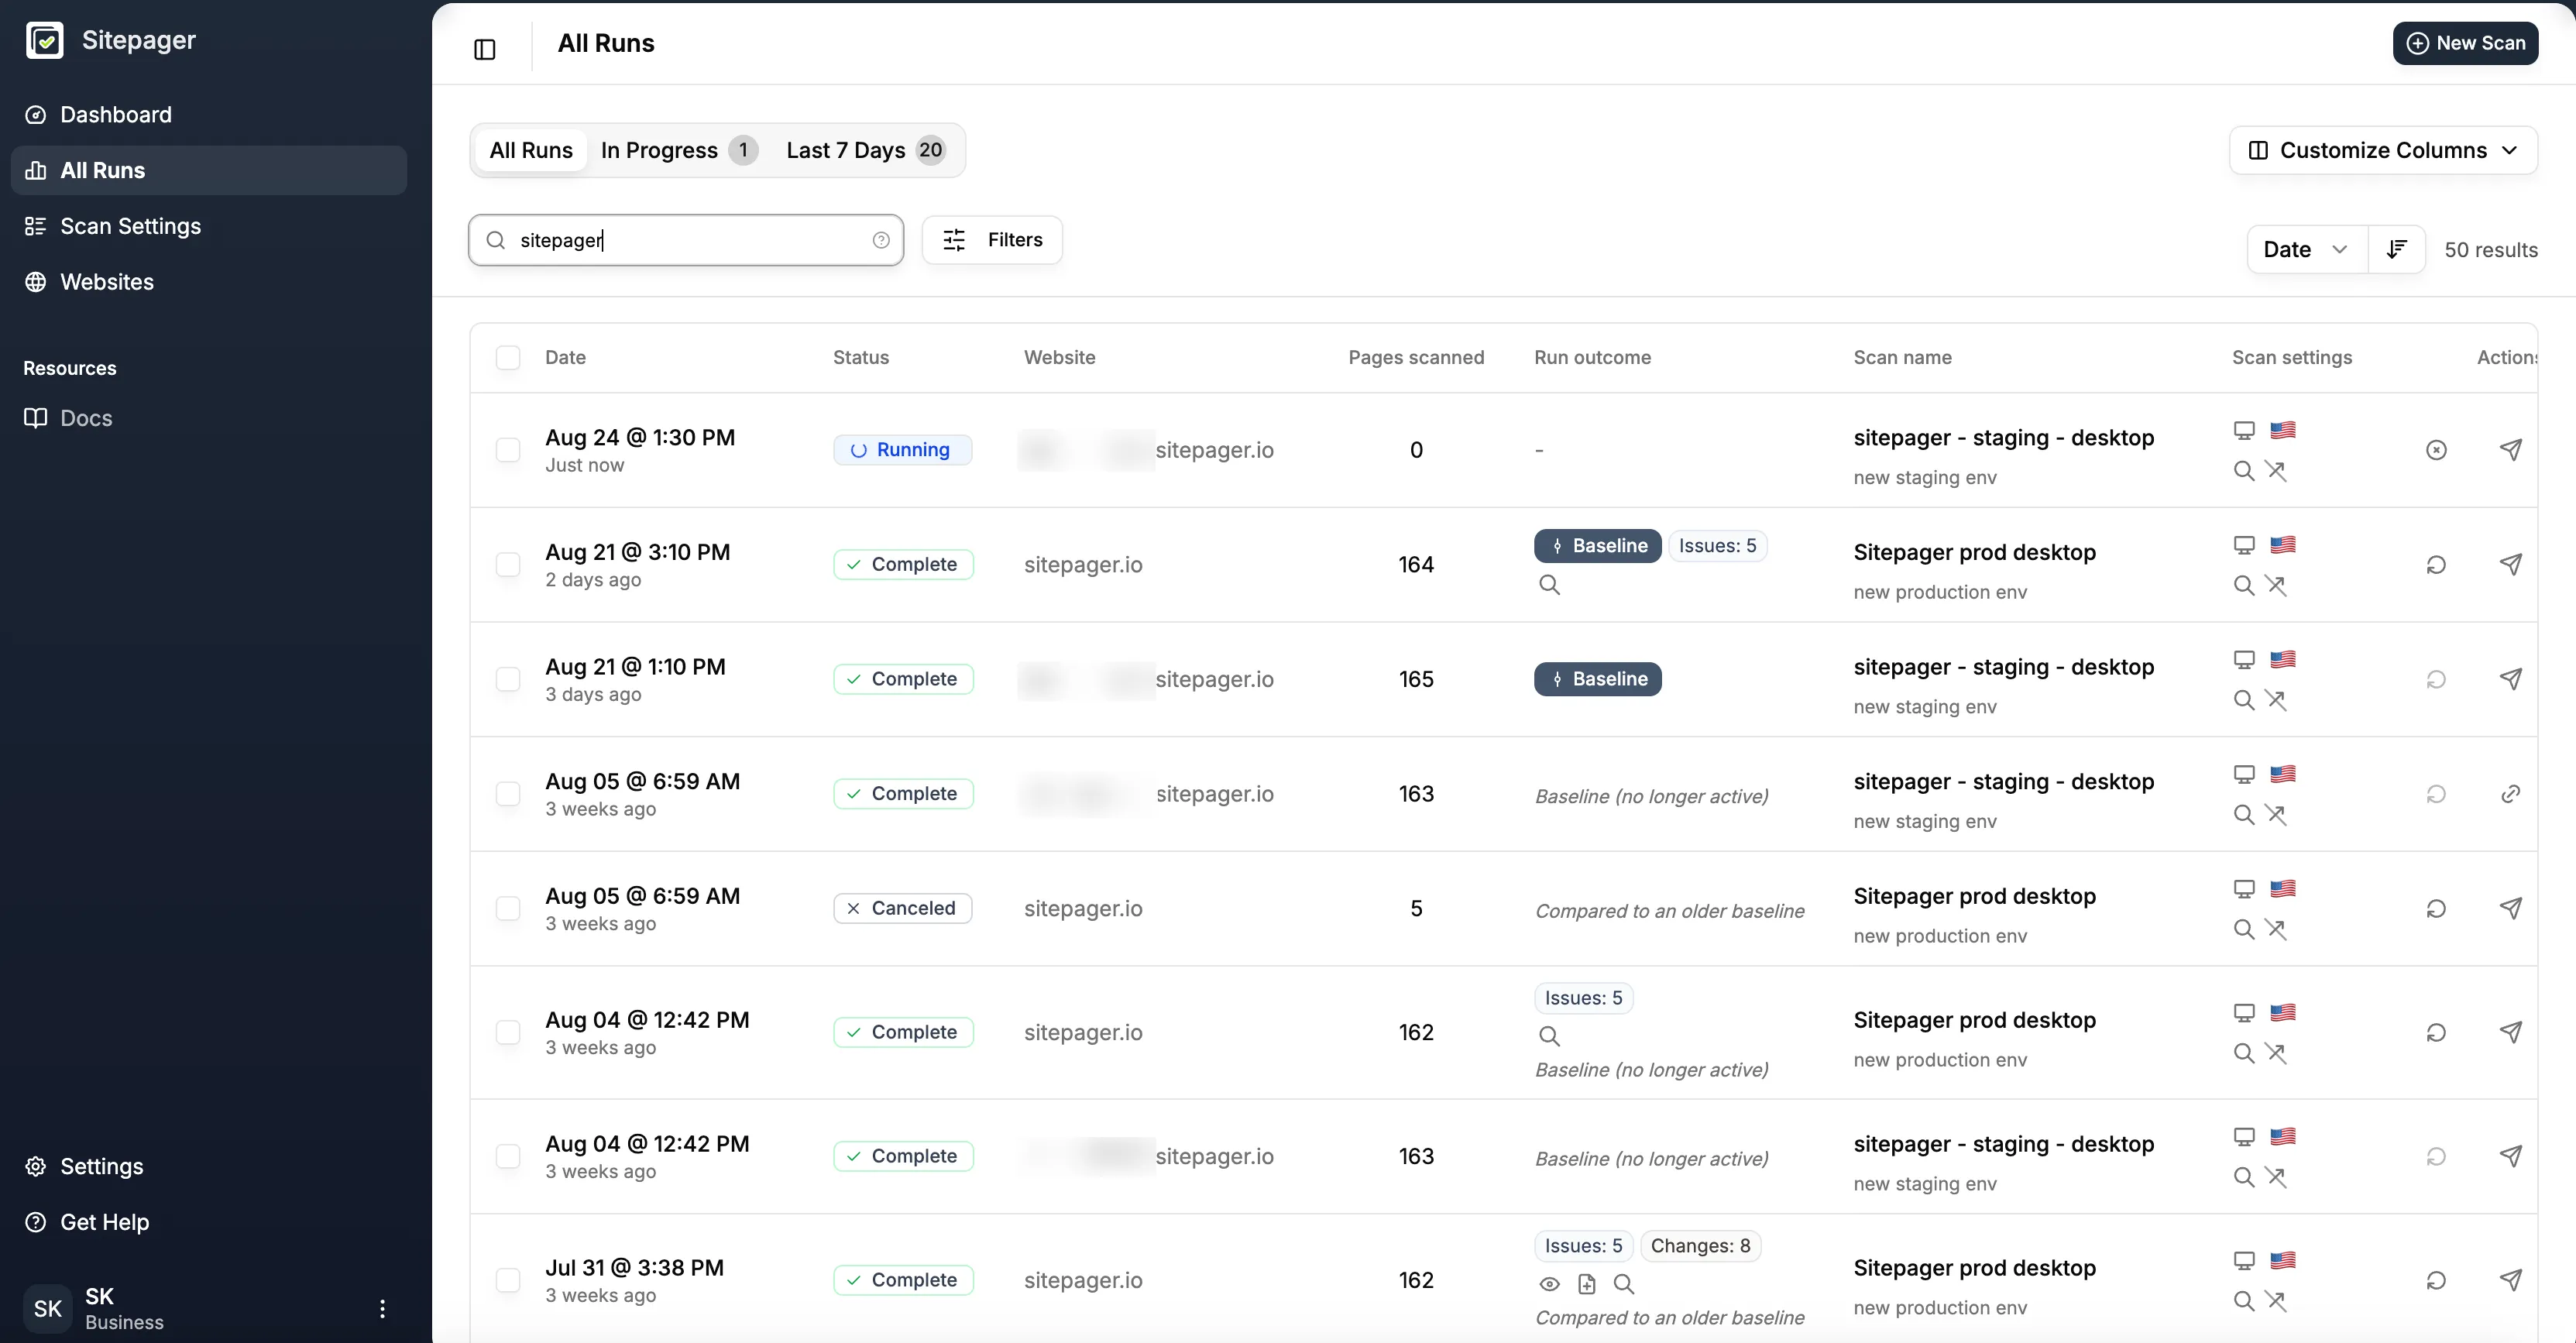
If this is the first time a scan has run, it creates the baseline and reports no changes. That is expected. Every run after it compares against that baseline, so the next run starts showing you what changed. See Understanding Baselines.
Sitepager can email you when a run completes or fails. See Email Notifications.
Checking the connection itself
Section titled “Checking the connection itself”The first time you set this up, you can confirm the connection in Settings → Integrations. It reads Waiting for first deployment until Sitepager receives one, then Active.
Active means Sitepager has received a deployment for this connection. If you configured both environments, a deployment from either one is enough to show Active, so it does not on its own confirm that both are wired up. Deploy each environment once to be sure.
If a run does not appear
Section titled “If a run does not appear”Work through these in order:
- Did the deployment succeed? The step only runs after a successful deploy.
- If you use GitHub Actions, did the Sitepager step run? Check the workflow logs. The generated step can fail without failing your deployment, so a successful deployment does not by itself mean Sitepager received the request.
- Was the right environment sent? The
environmentin the request decides which scans run. A staging value only runs staging scans. - Does that environment have scans selected? If it reads Not set up, nothing will run.
- Does the configured URL match a website in Sitepager? If the URL is correct but that website does not exist in Sitepager yet, add the website and return to Settings → Integrations. The connection picks it up automatically. If the URL itself is wrong, correct it with Edit site details.
- Does the site still read Waiting for first deployment? Then Sitepager has not recorded a deployment for this connection yet, so start with your workflow rather than your scan setup.
If Sitepager starts the run but cannot access your site, website security may be blocking it. See Allow Sitepager Through Your Firewall.
Still stuck? See Troubleshooting.
How it fits into the release process
Section titled “How it fits into the release process”Auto run on publish removes one step from the loop: remembering to run your scans. Everything after that stays the same.
You deploy, Sitepager runs the scans you selected for that environment, and you review what changed. When the changes are the ones you intended, update the baseline so the next run compares against them.
For staging and production workflows, set up scans for each environment so you can catch changes on staging before they reach visitors. See Compare Environments for checking one environment against the other.