How to Test a Website Migration
A website migration — redesign, platform move, or infrastructure change — can introduce issues across hundreds of pages that are easy to miss before launch.
You’ve spent weeks or months planning and building your new site, redesigning, migrating content and planning redirects. You’ve tested it in staging, and you’re ready to launch. But before you do, you need to be sure it’s ready to go live.
Before you cut over, these are the questions you need to be able to answer:
- Does it look right visually?
- Are all links still working?
- Did any pages go missing — or did new pages get added that shouldn’t have?
- Did the metadata carry over correctly?
- Does the new site perform well enough to launch?
Sitepager surfaces all of these across a few scans. Here is how to use it.
When we migrated sitepager.io from Framer to Astro on Cloudflare, this is the process we used.
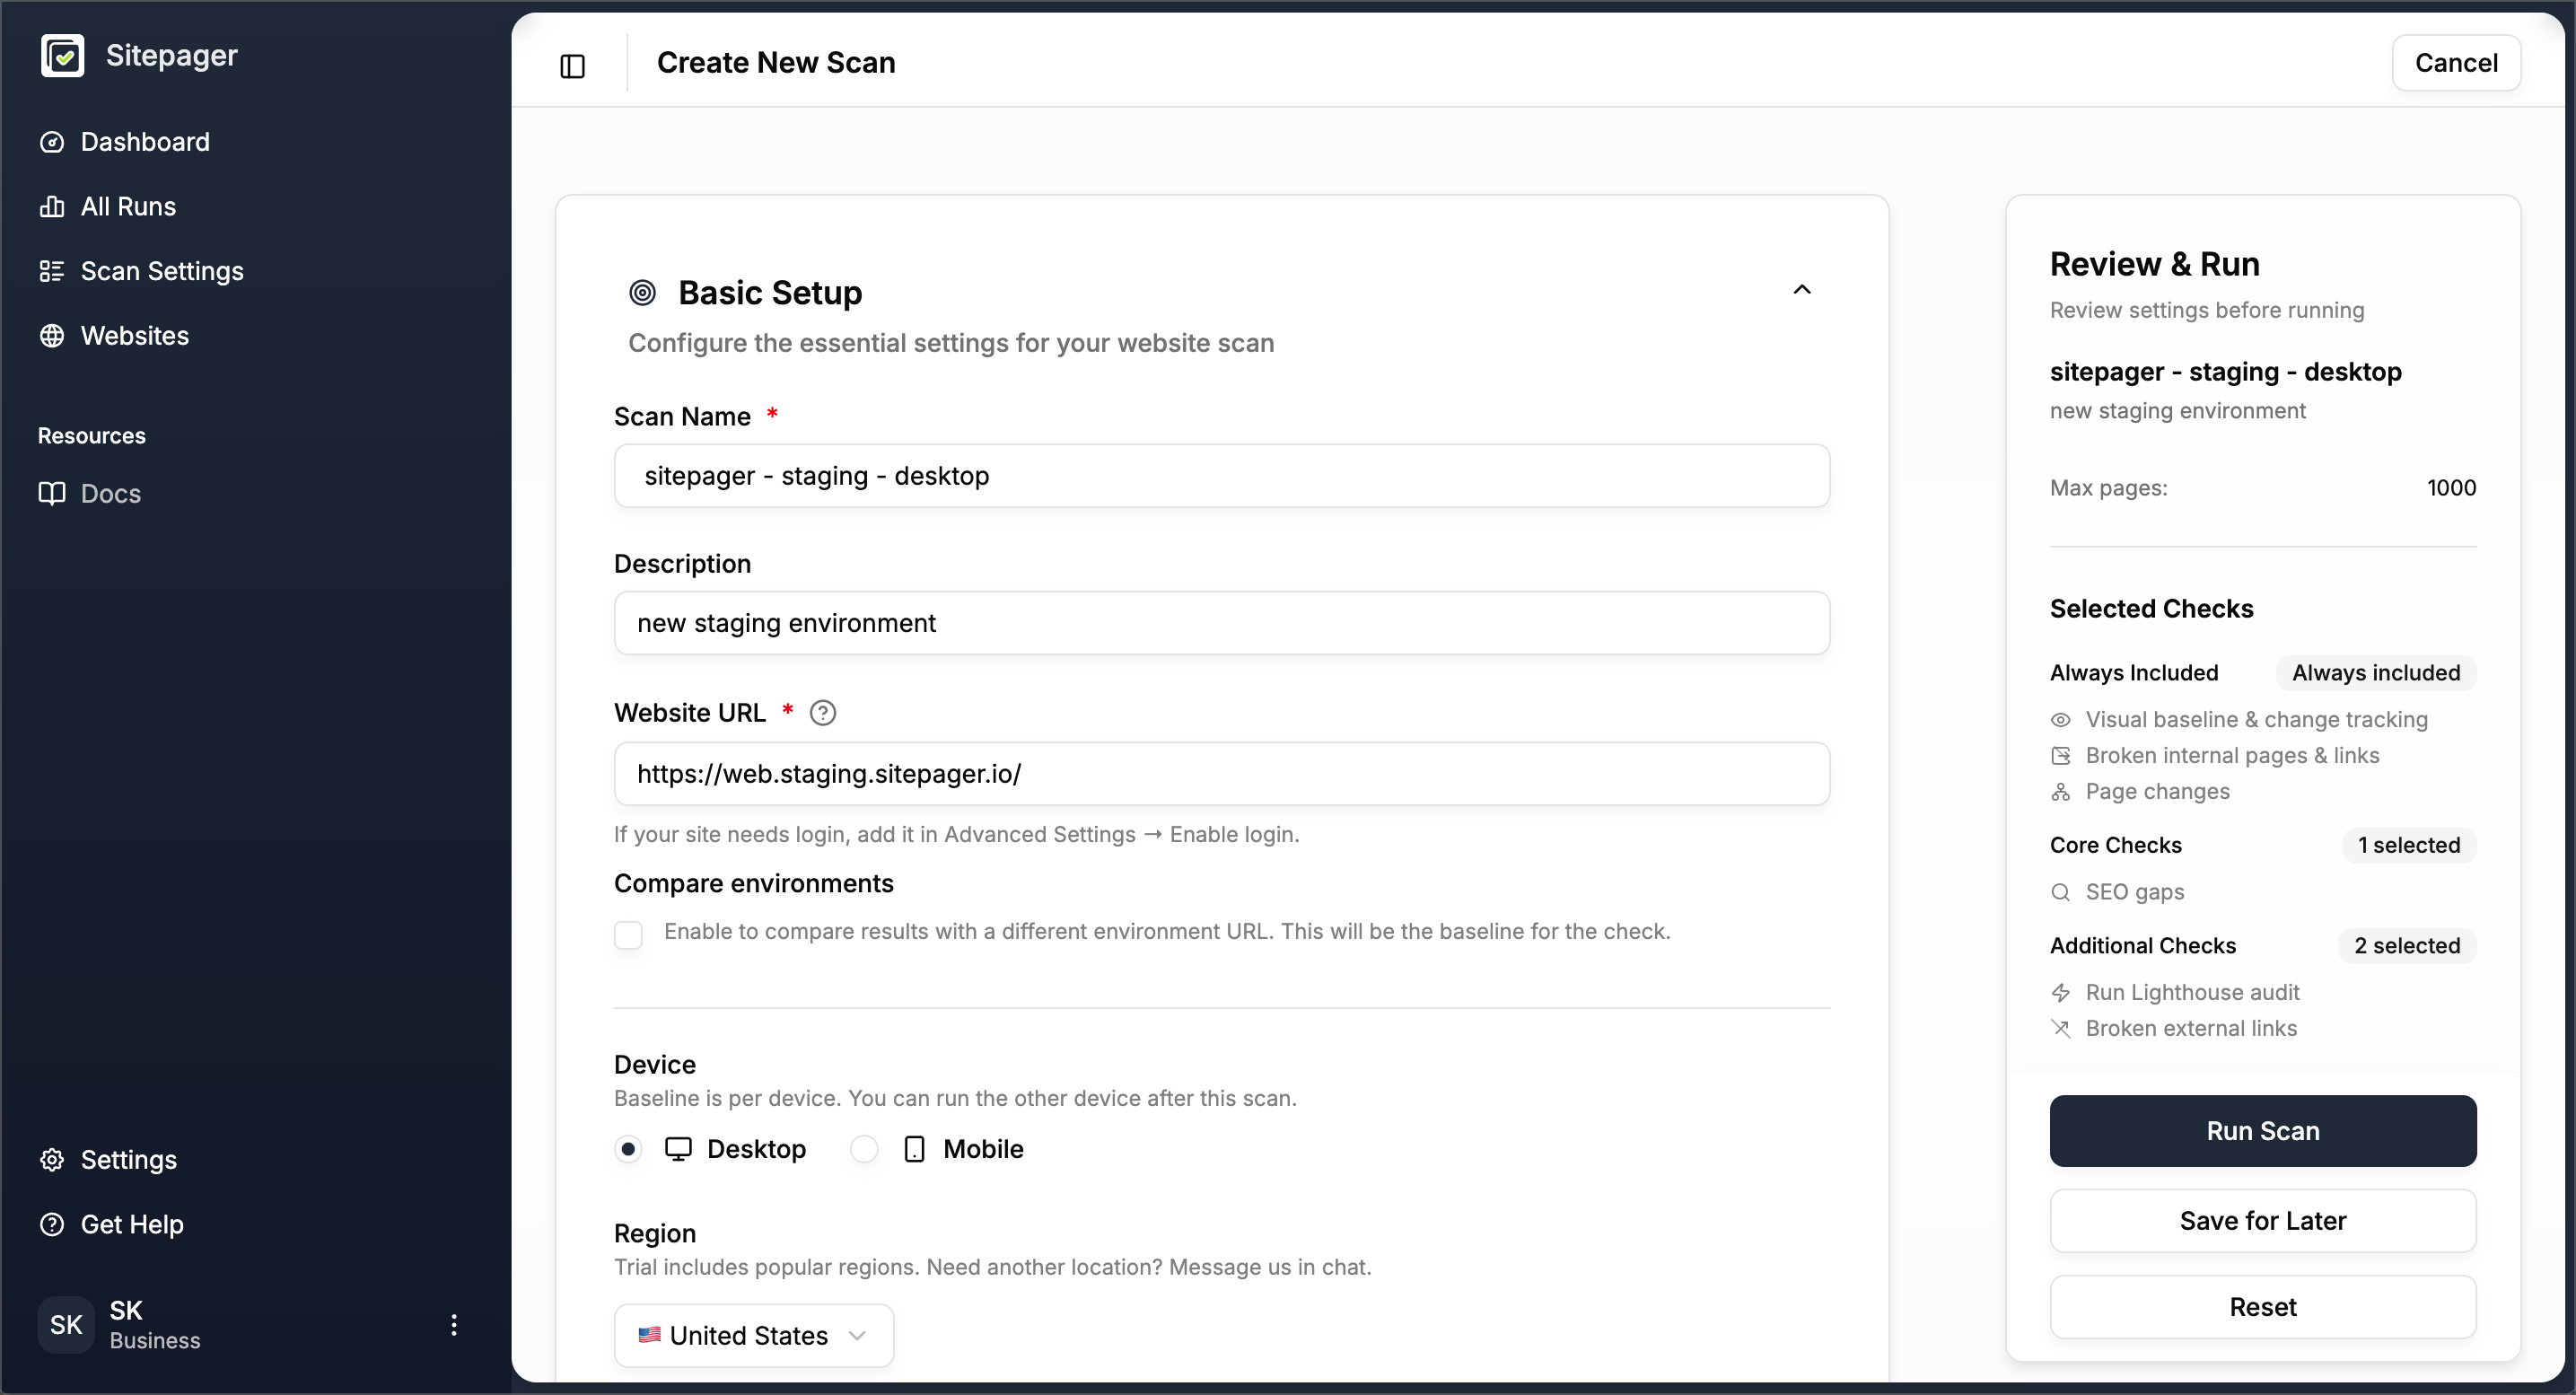
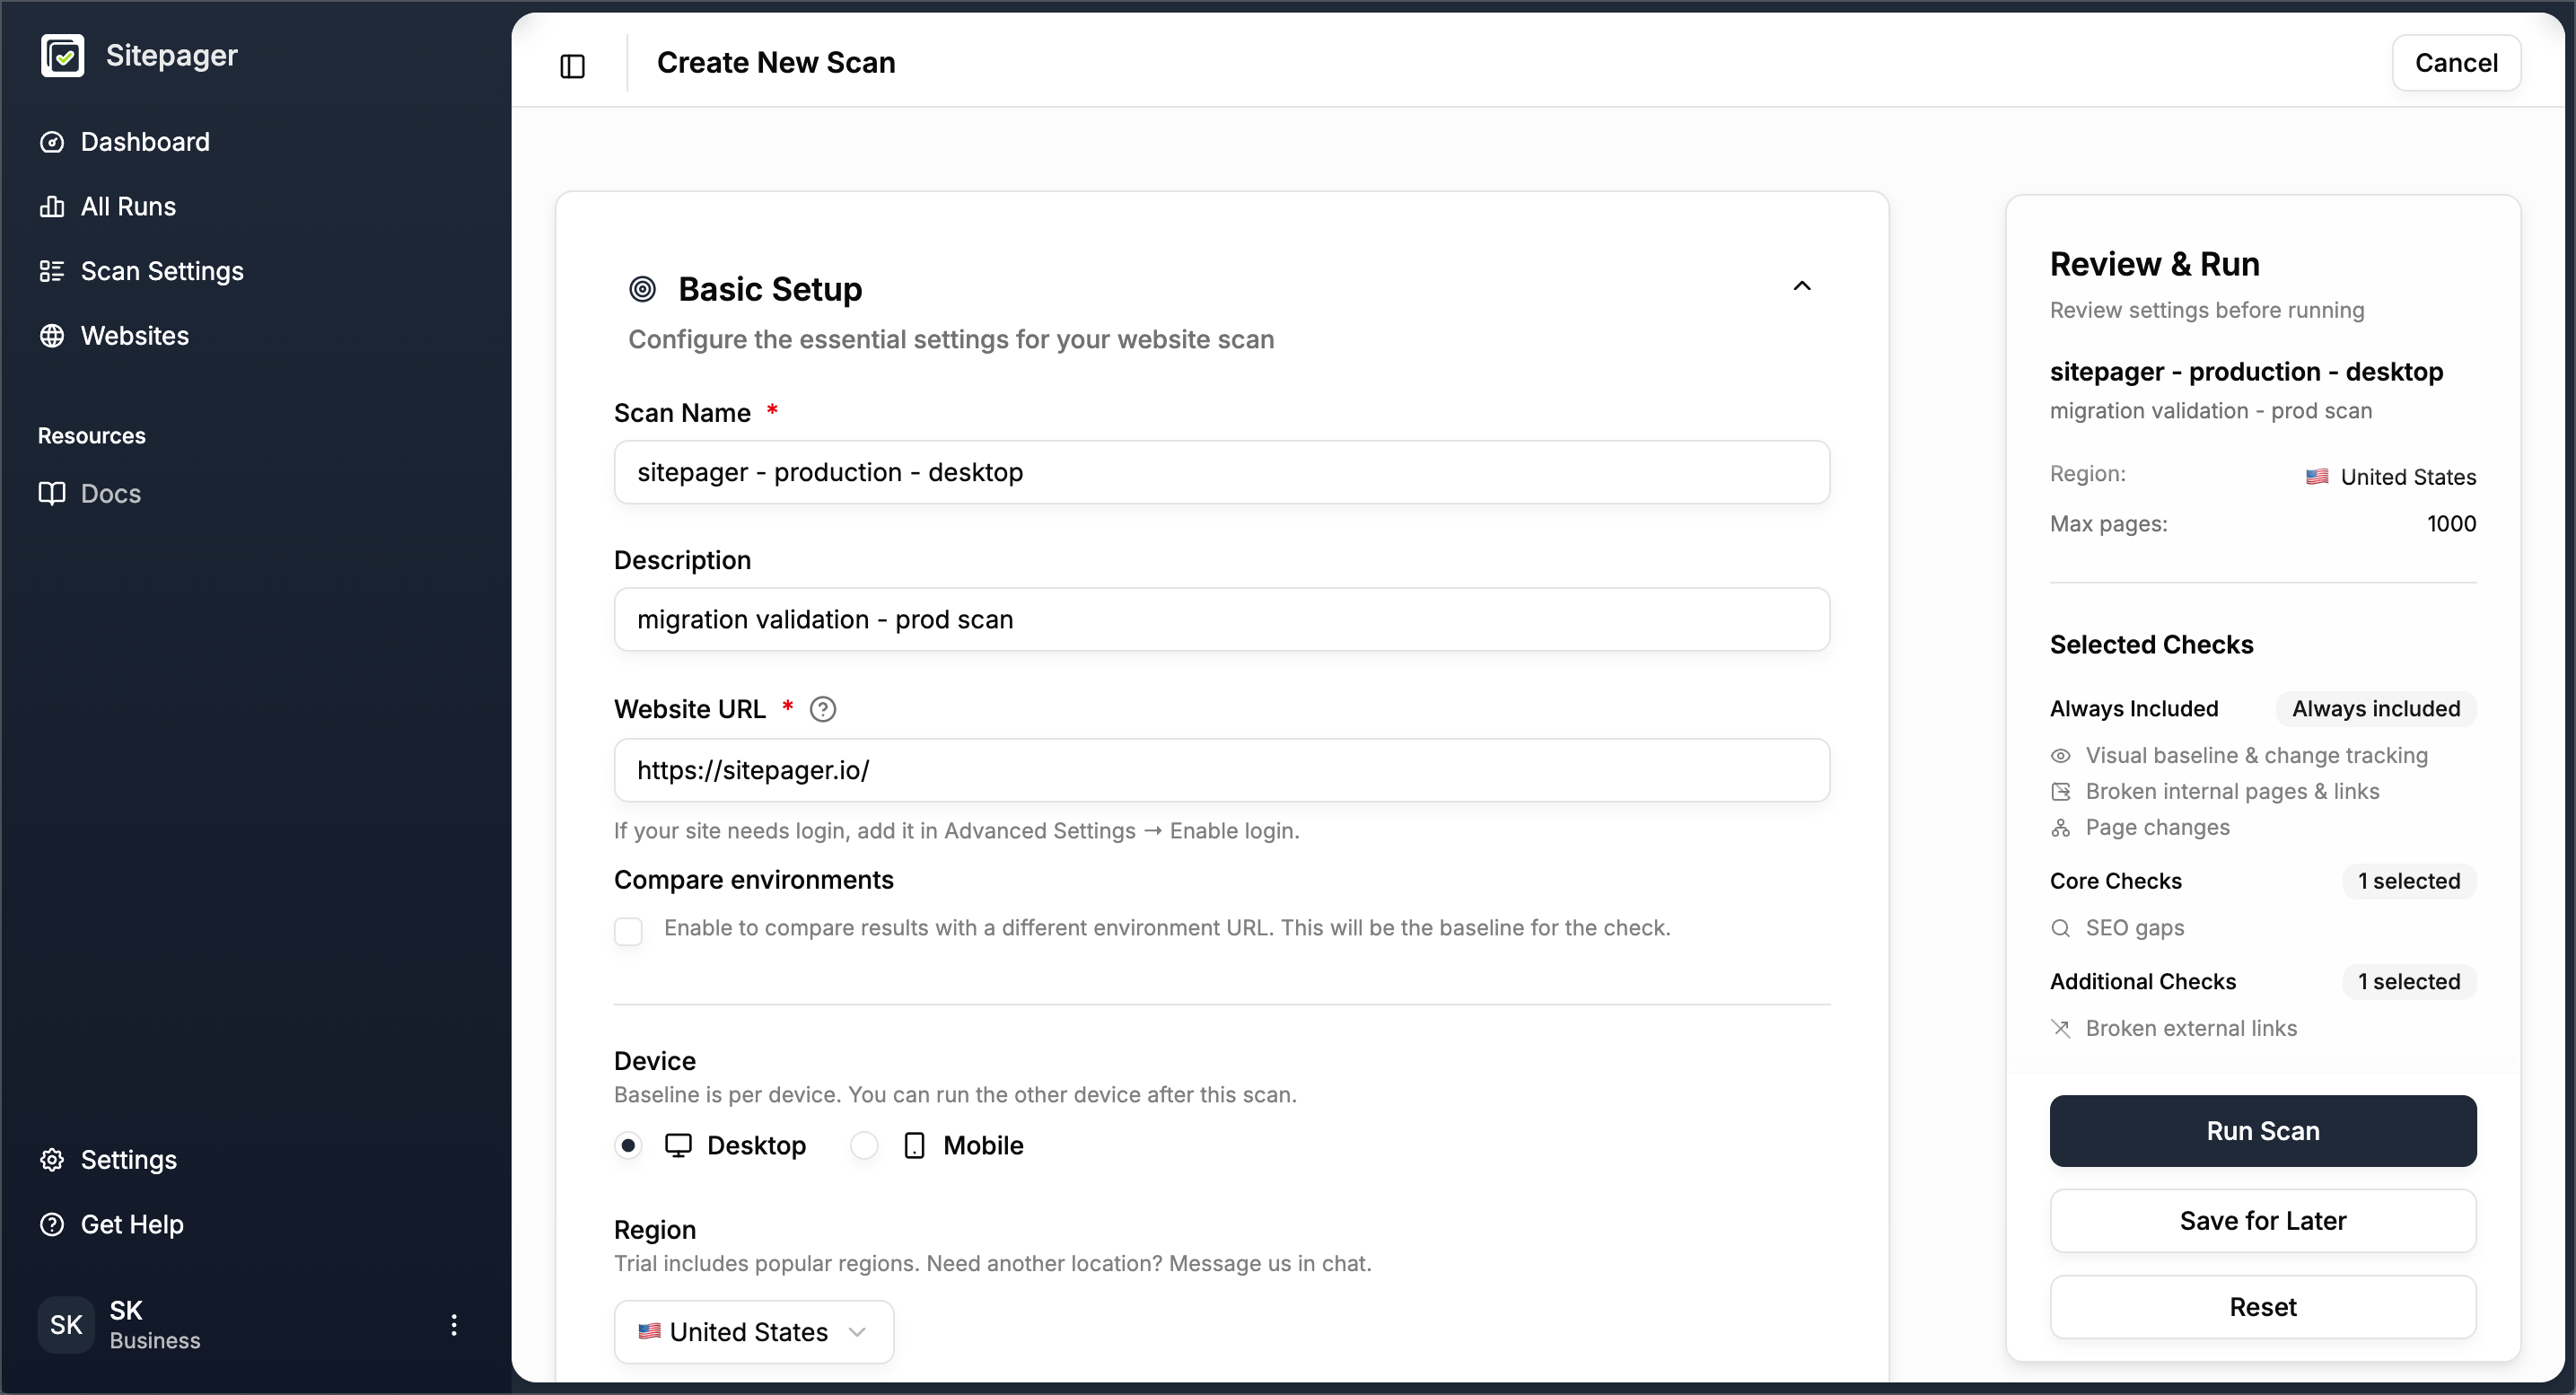
Step 1: Scan the staging site on its own
Section titled “Step 1: Scan the staging site on its own”Start by scanning the staging site independently. Create and run a new scan using your staging URL. This confirms the new site is working properly before comparing it with the live version.
Additionally, consider running scans for both desktop and mobile. Visitors use both devices, and layout or interaction issues on one device do not always appear on the other.
What to look for:
Does it look right on desktop and mobile?
Section titled “Does it look right on desktop and mobile?”Review the screenshots for each page. Check that fonts, colors, and spacing render correctly across the site. Global components such as the header, footer, and navigation should appear consistently on every page.
On mobile, look for elements that are clipped, overflowing, or misaligned. Layout issues usually stand out quickly in the screenshots.
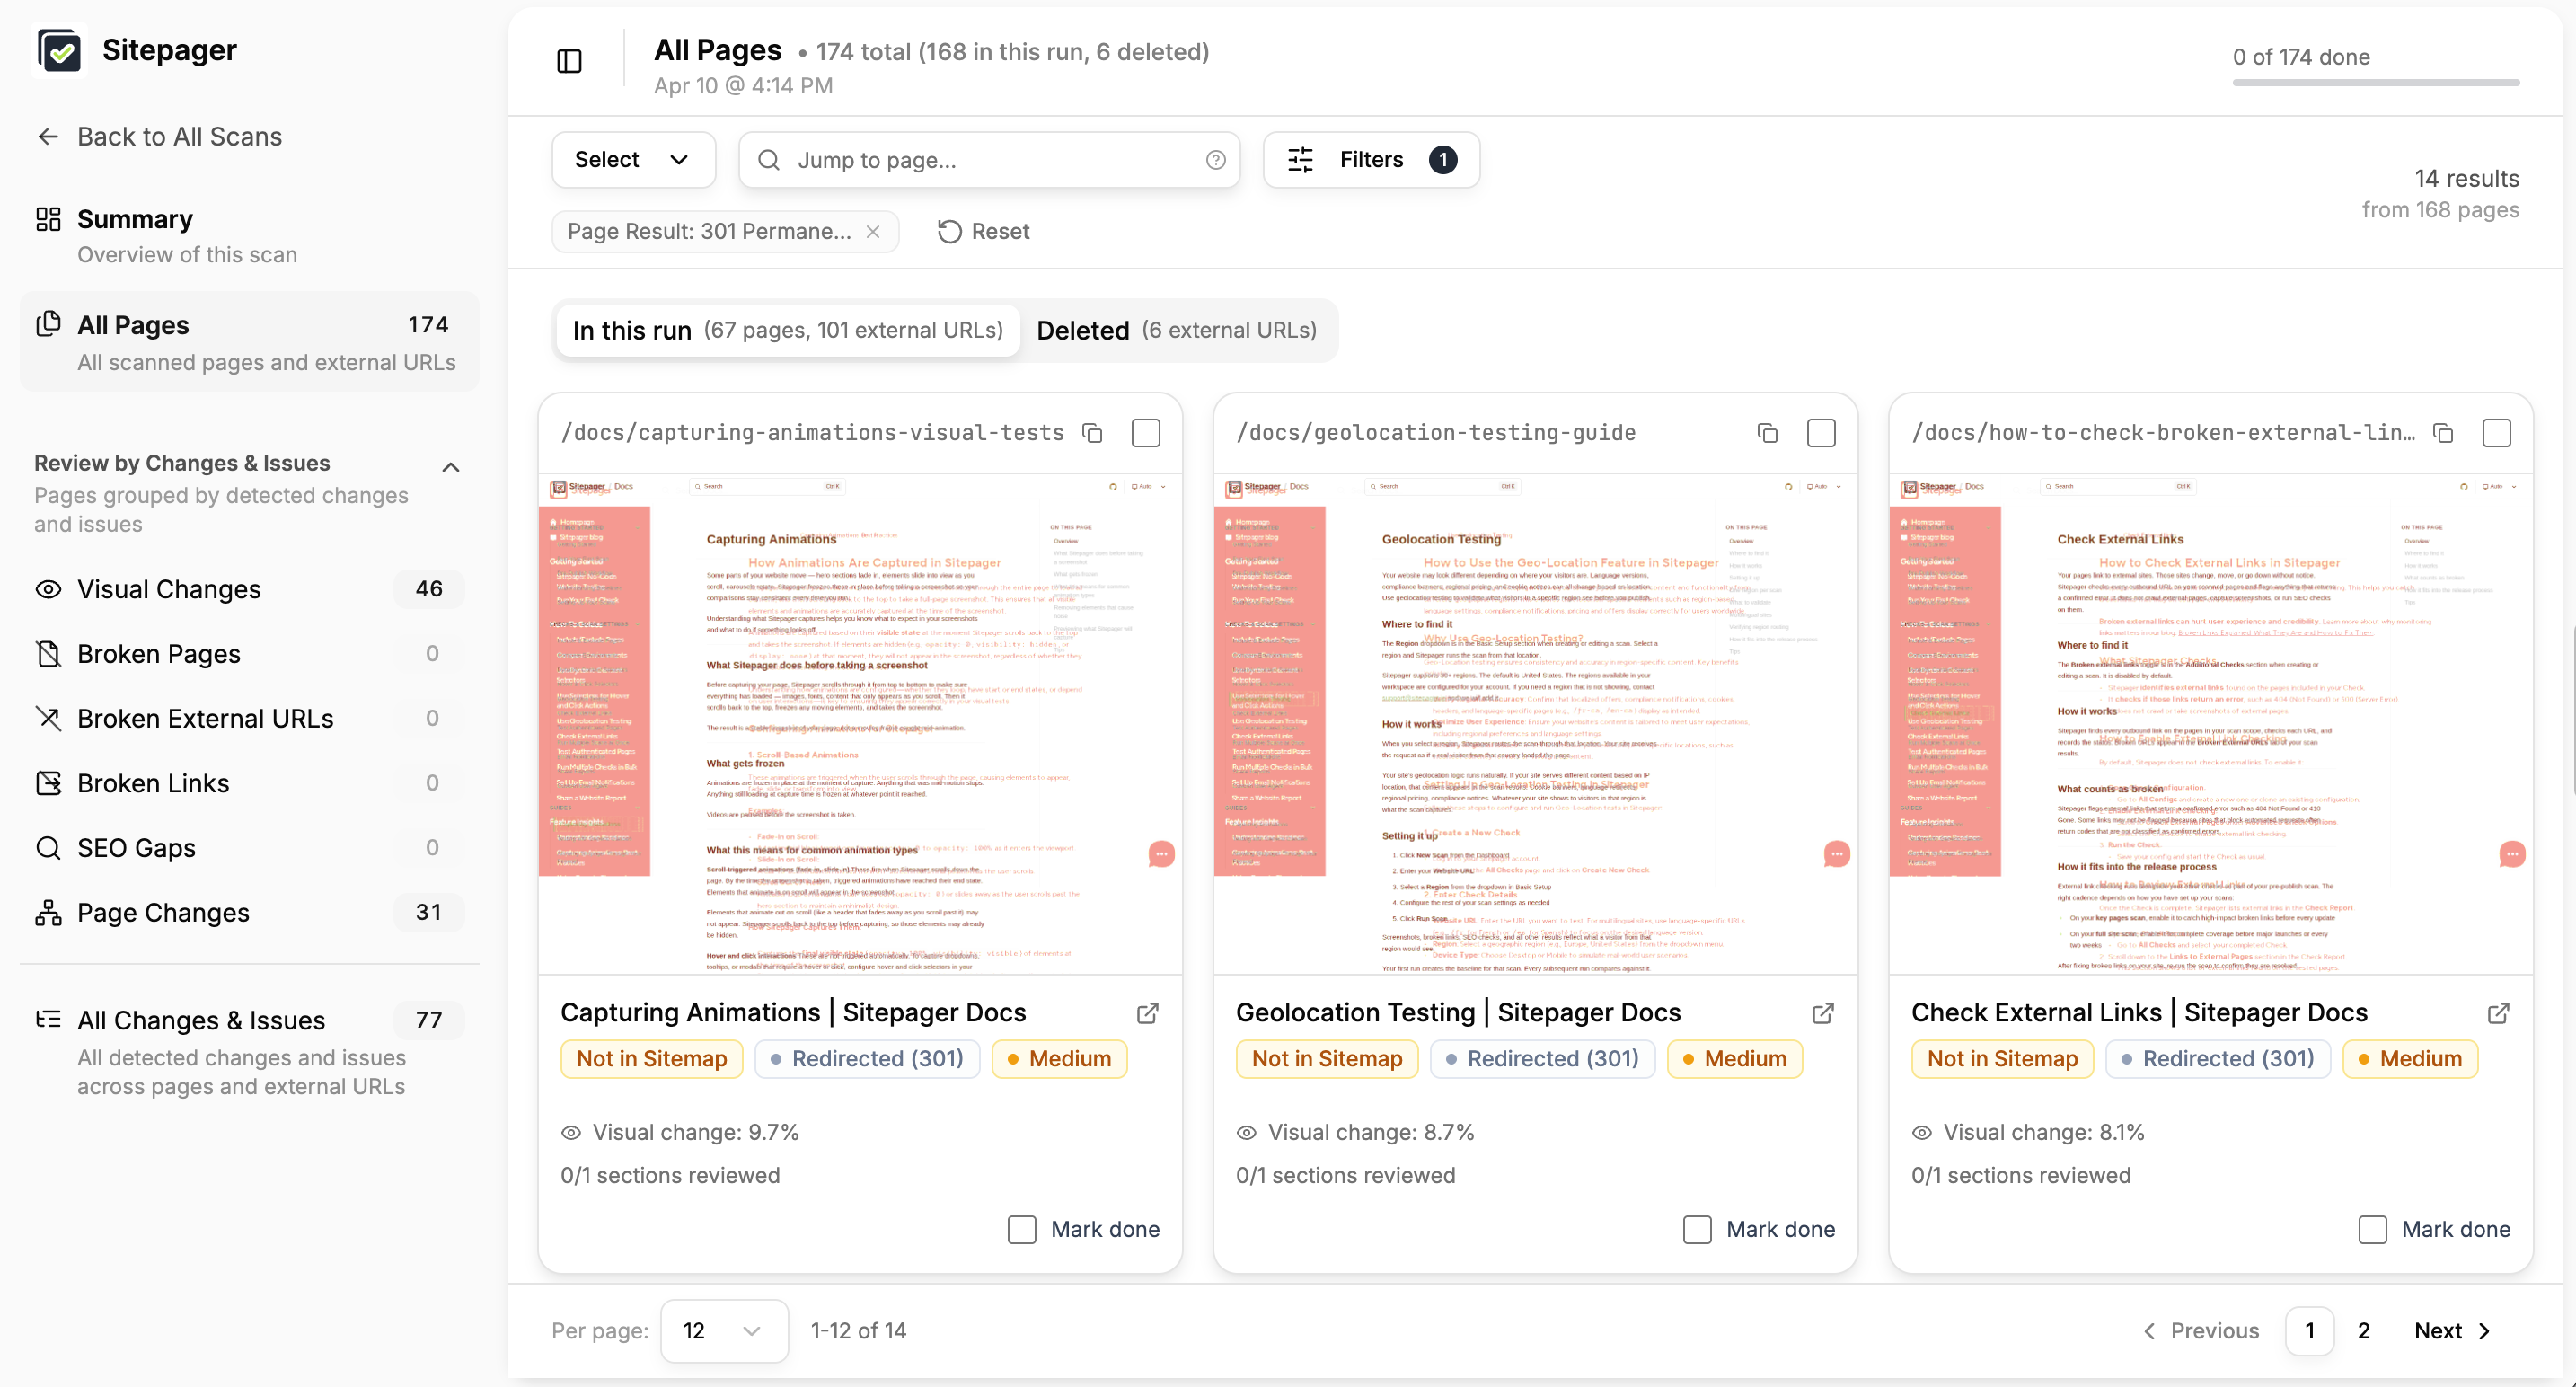
Are all links still working?
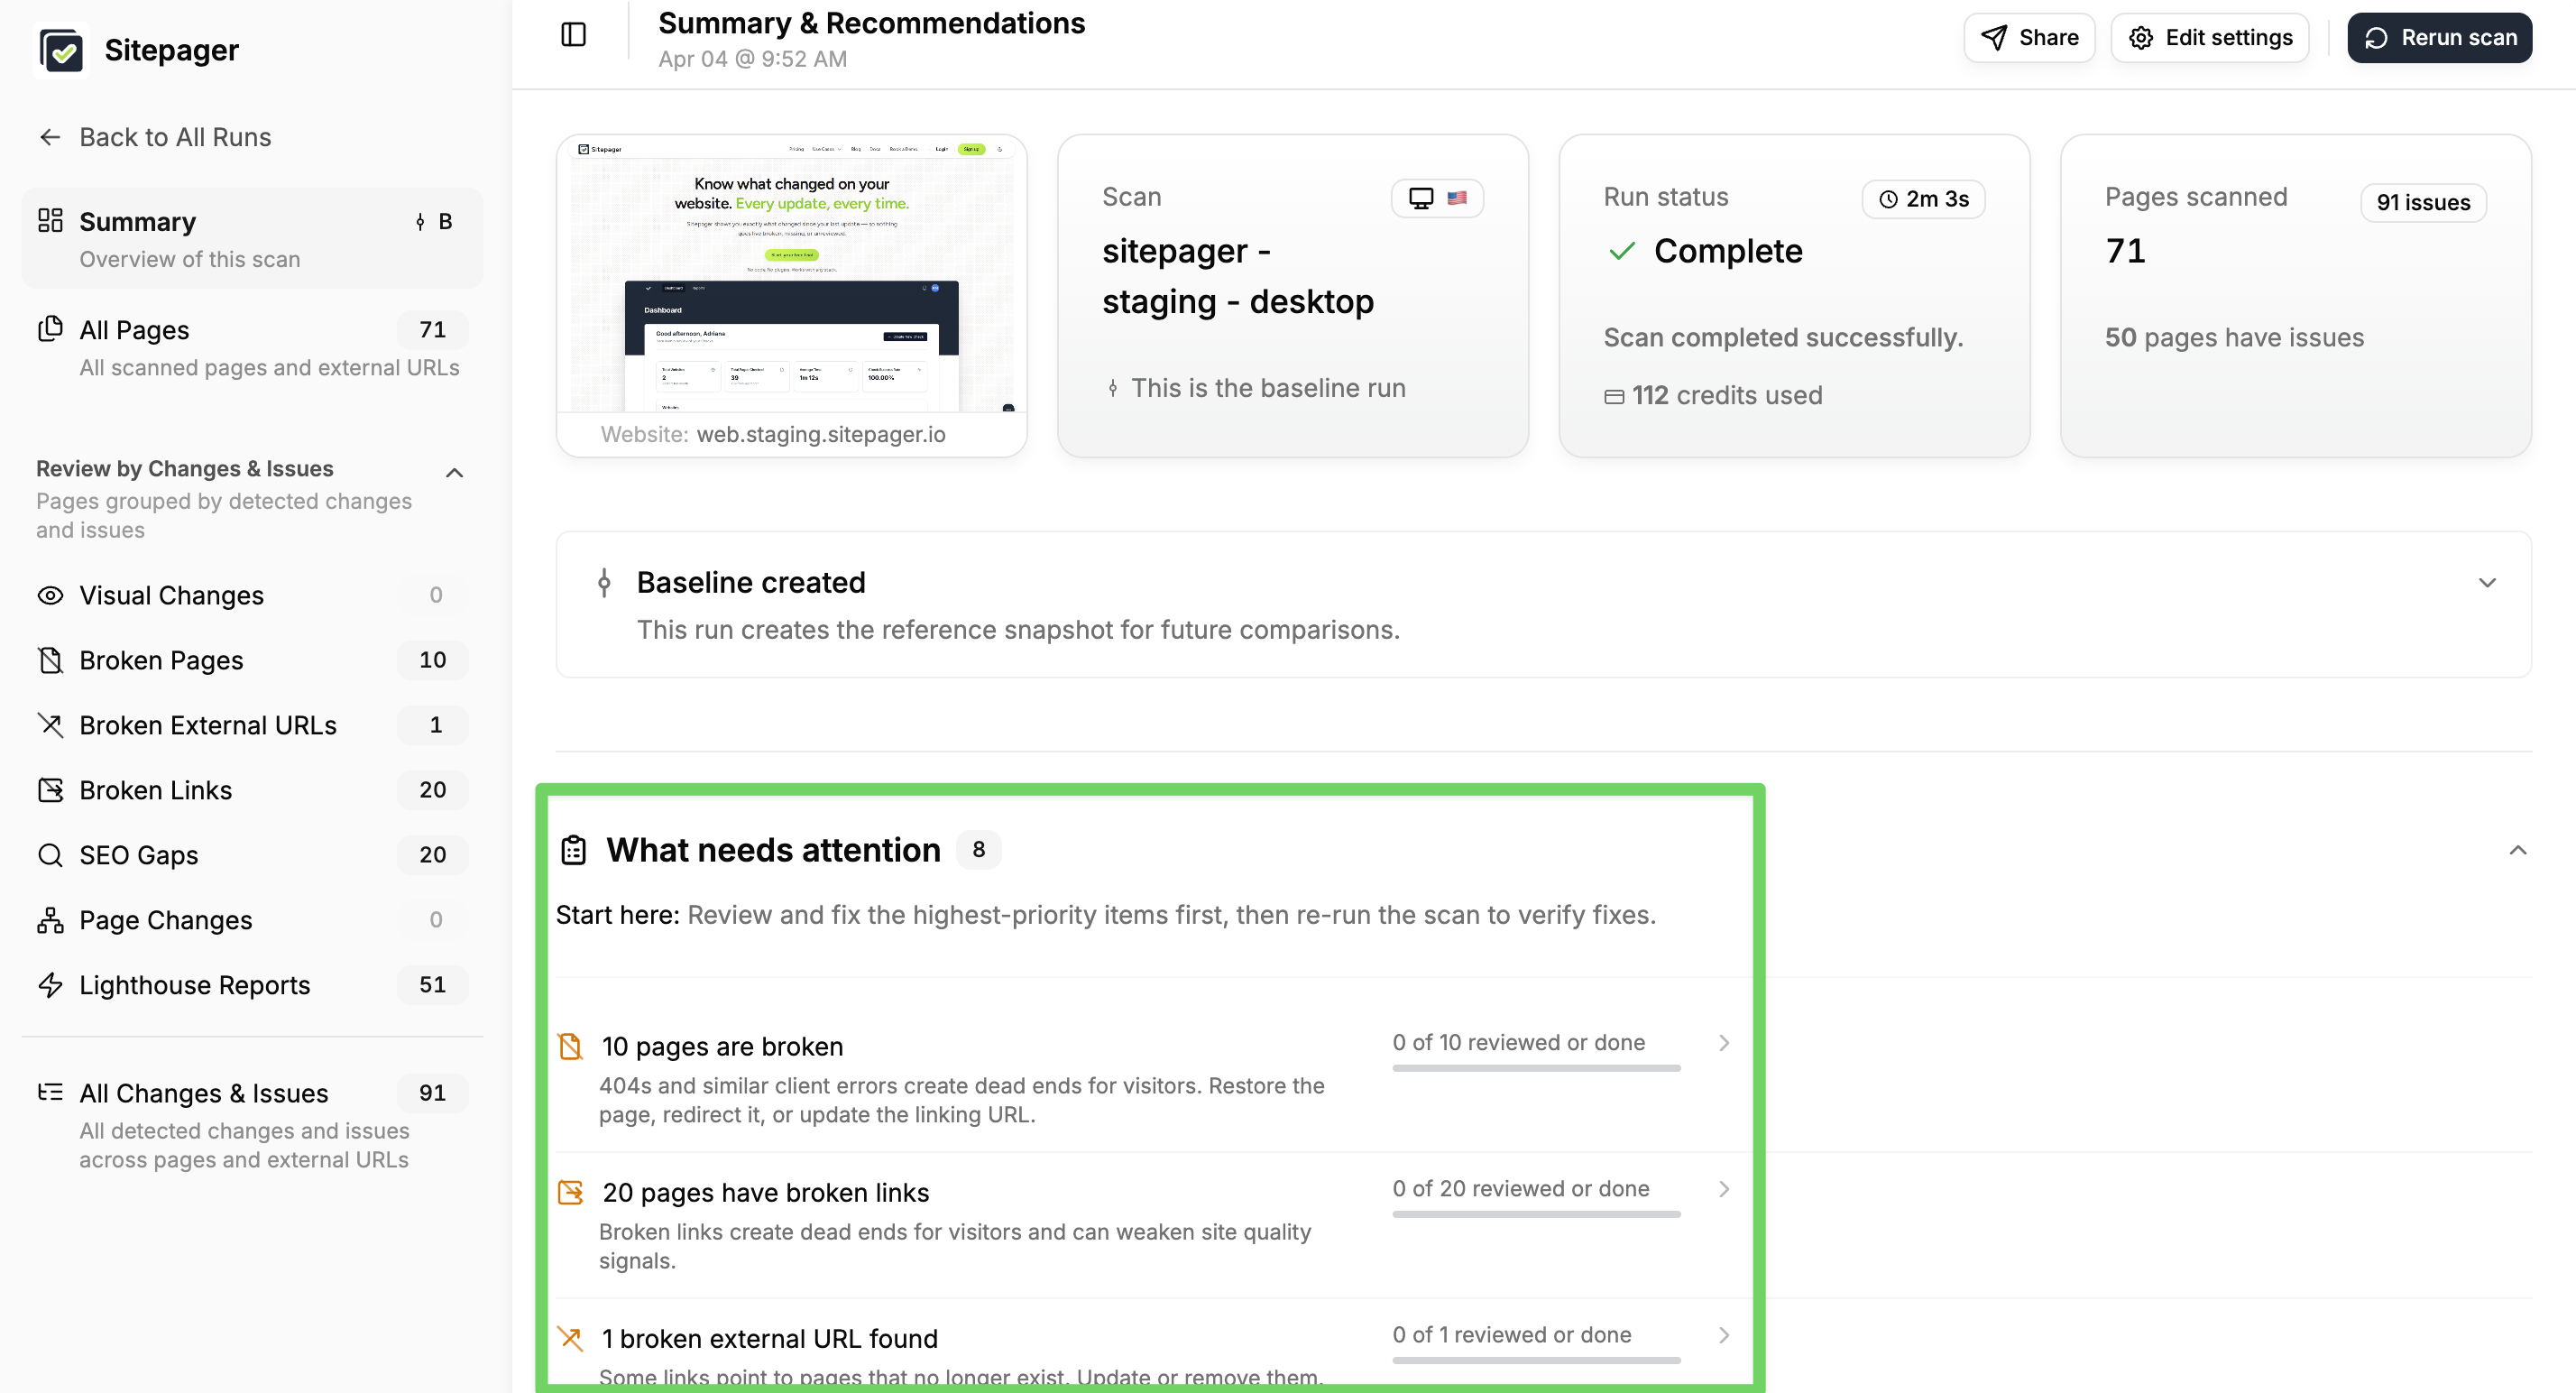
Section titled “Are all links still working?”Migrations often break links — internal links pointing to old routes that no longer exist, and external links to resources that have moved. The Broken Links tab groups these by page, showing a count of broken internal and external links for each. Click into any page to see the exact links, anchor text, and HTTP status codes — everything you need to fix them without guessing.
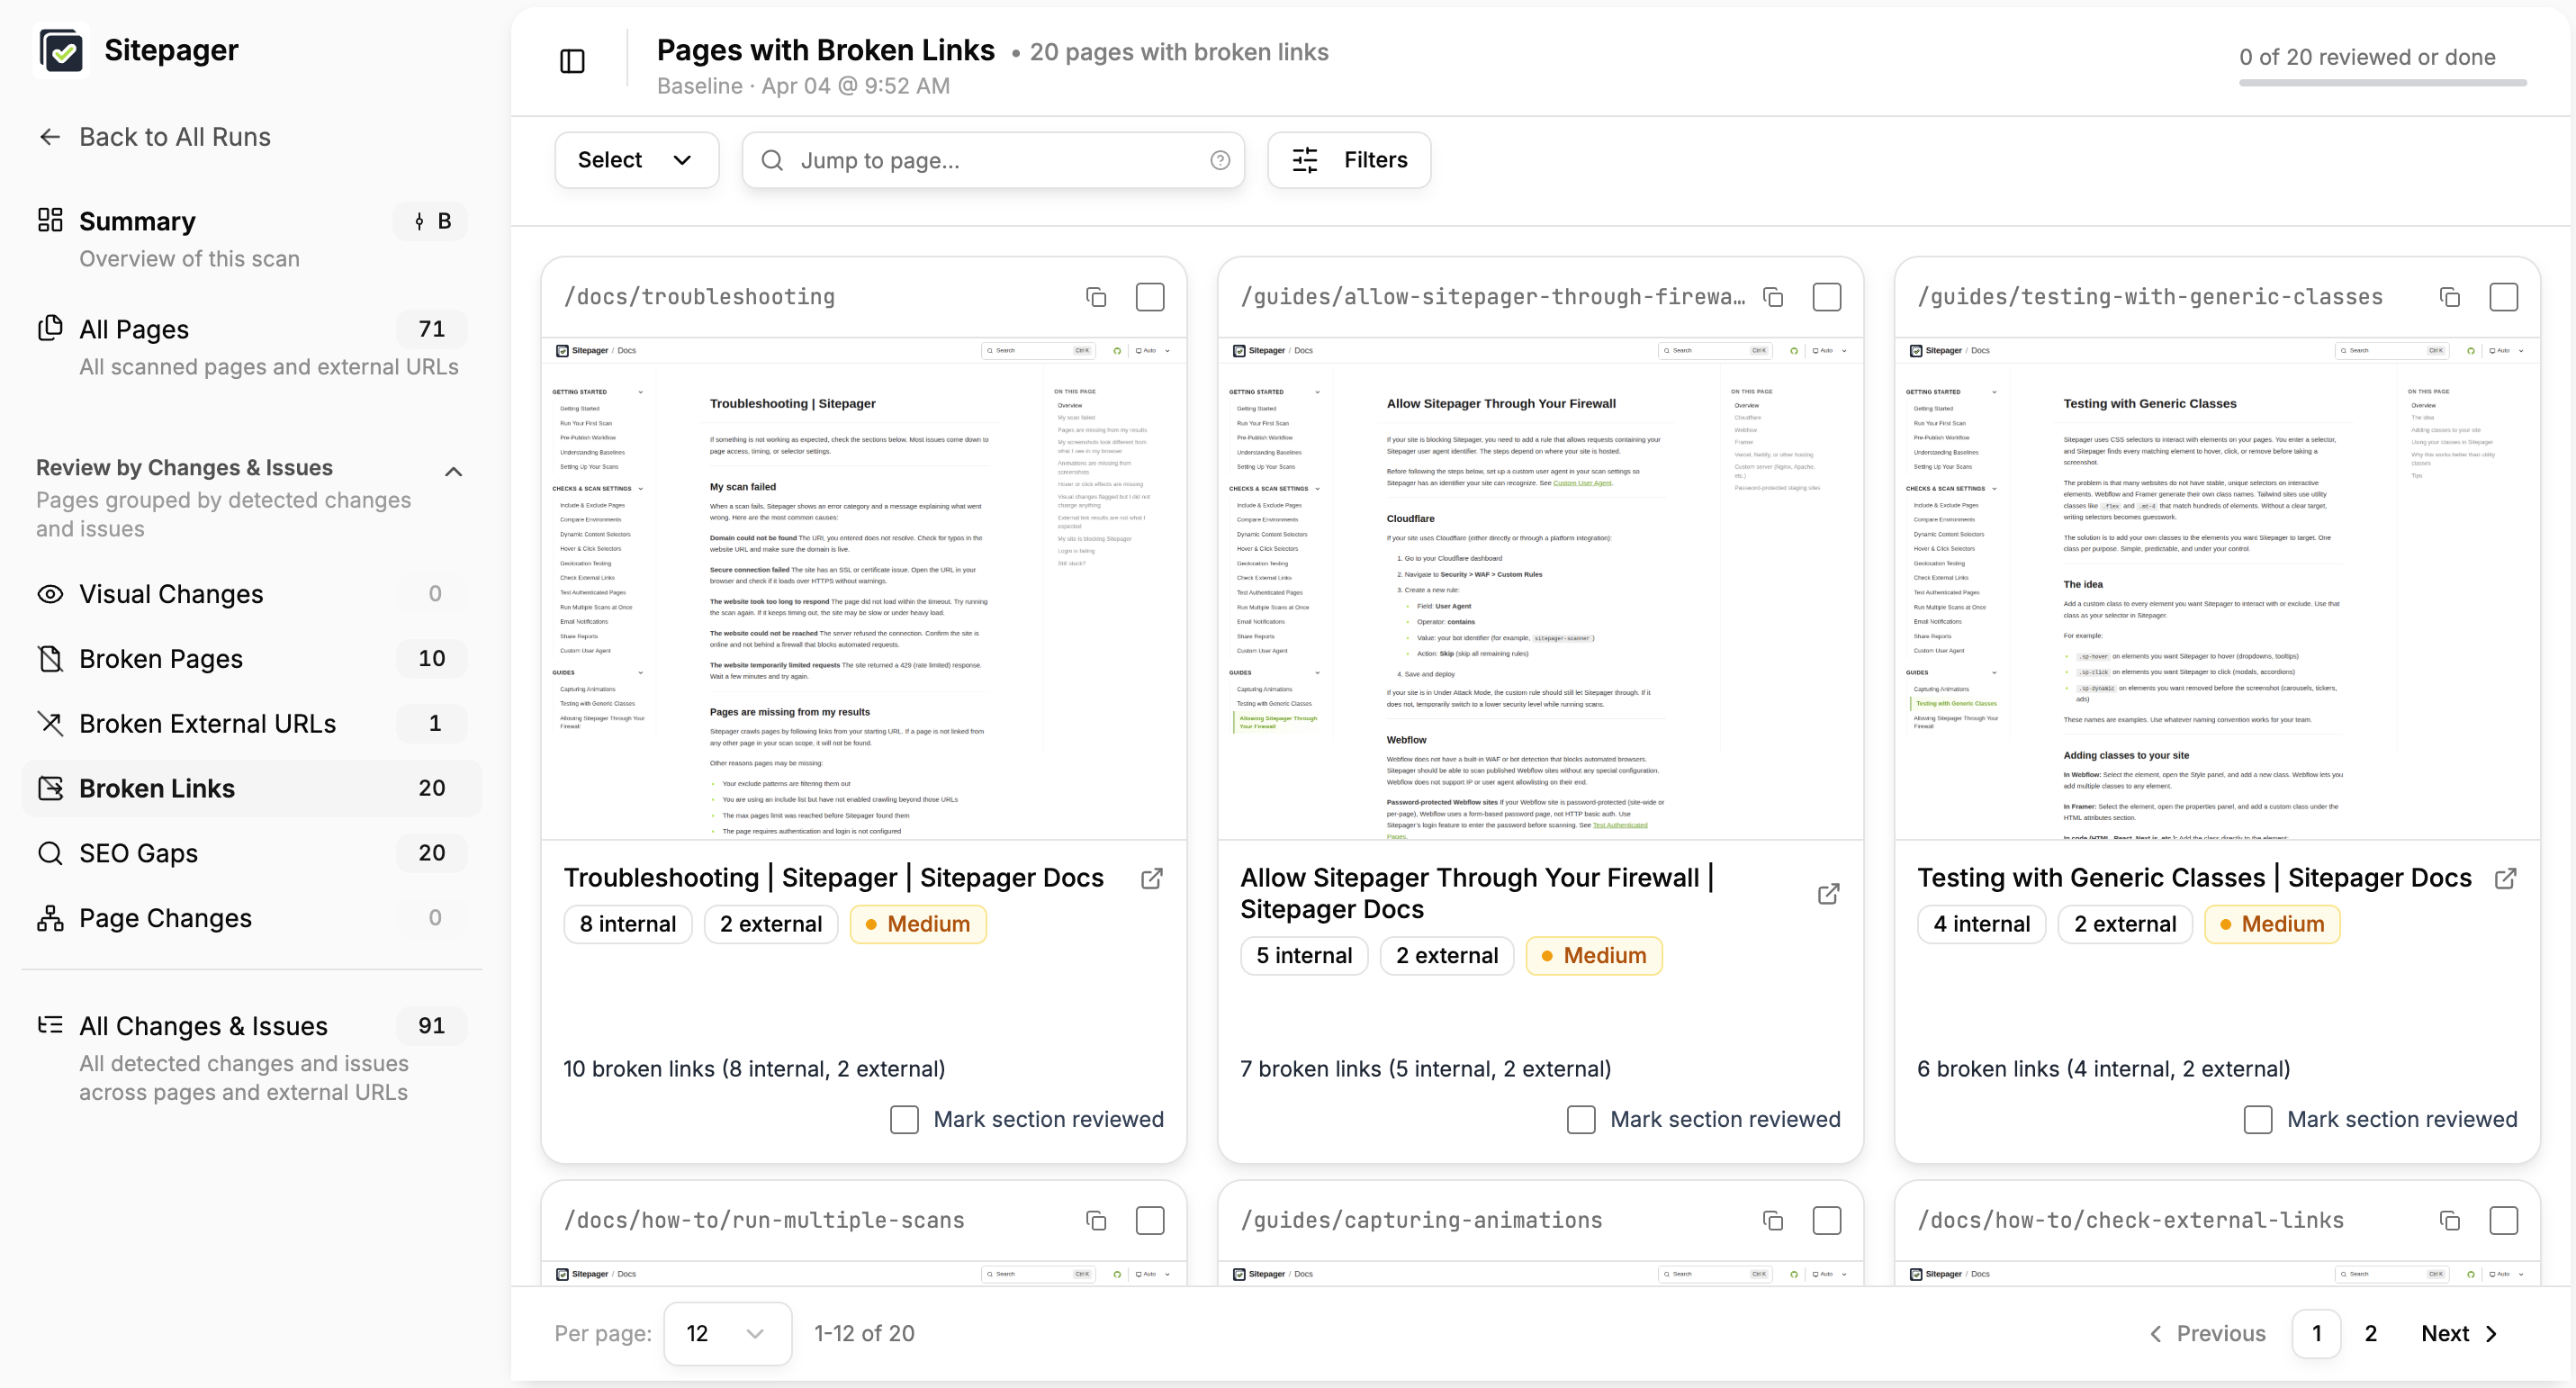
Several of our internal links still pointed to old Framer routes that no longer existed on the new site. The report showed exactly where each one was, making it easy to fix.
Did metadata carry over correctly?
Section titled “Did metadata carry over correctly?”Titles, meta descriptions, Open Graph tags, and heading structure can go missing or change during a migration. The SEO checks flag missing or incomplete metadata across every page.
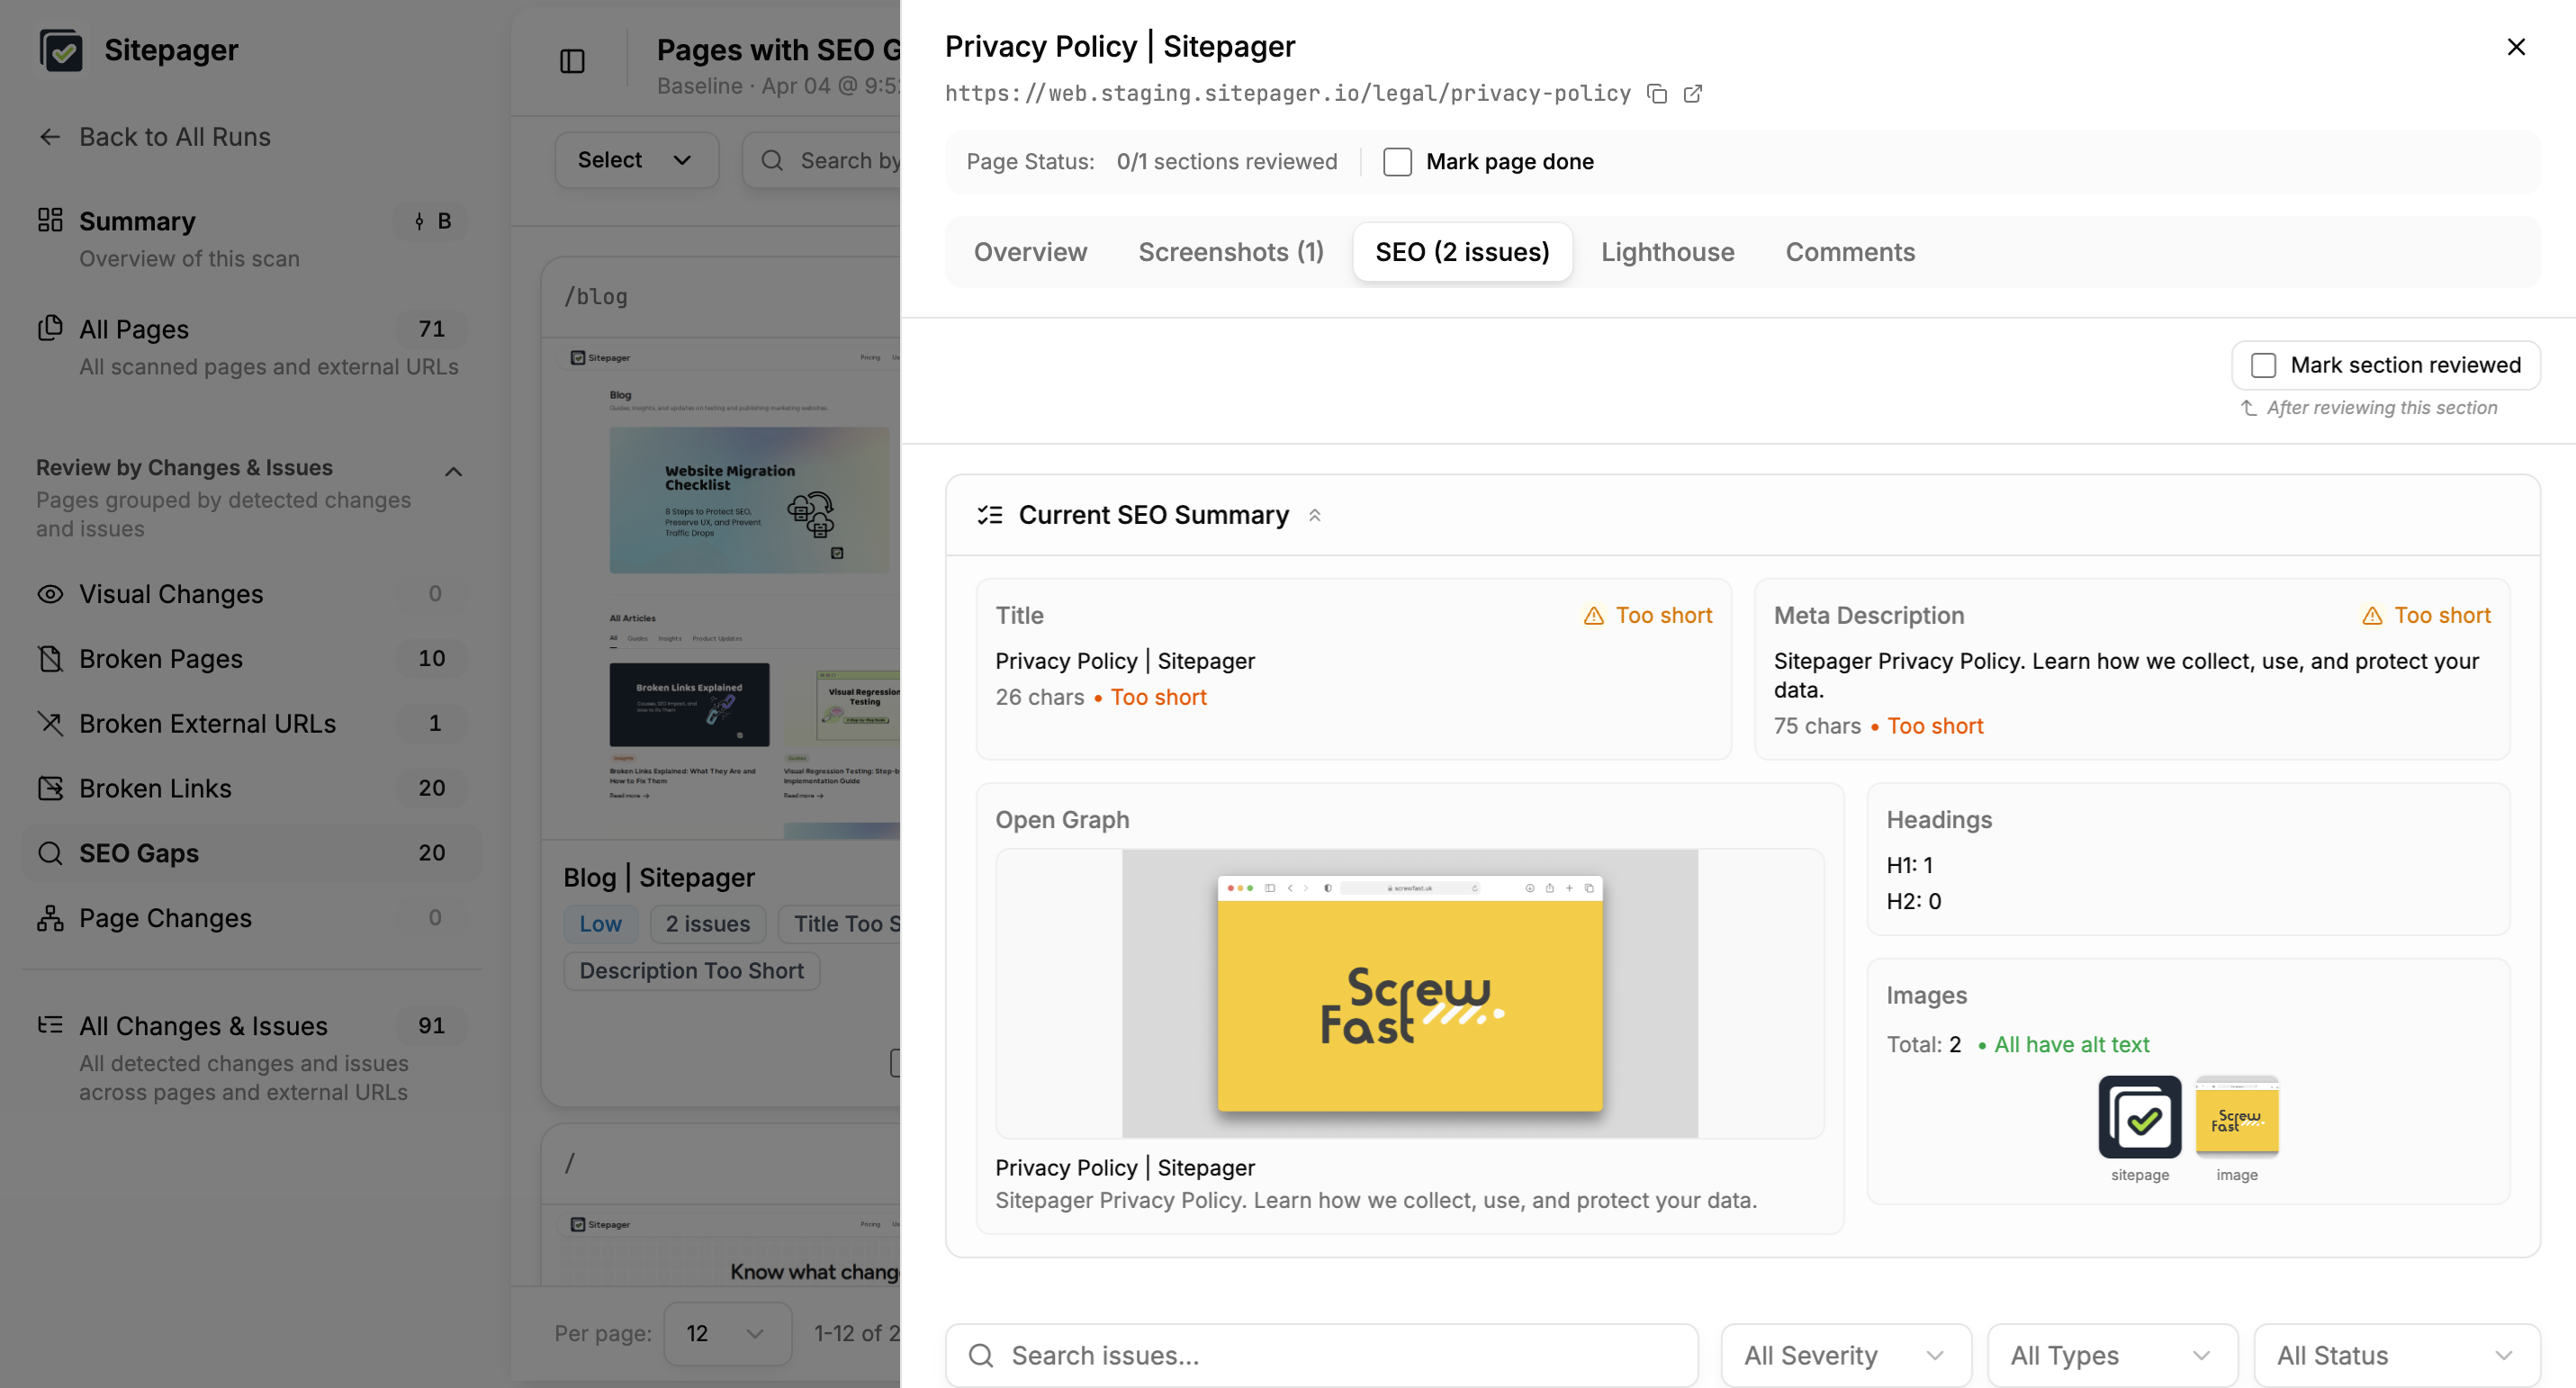
During our migration, we noticed that Open Graph images were pointing to a generic fallback instead of page-specific images. We also took the opportunity to tighten up meta titles, descriptions, and heading structure — which introduced a few issues of its own, like short titles and a broken heading hierarchy. The SEO checks caught all of it.
Does the new site perform well enough to launch?
Section titled “Does the new site perform well enough to launch?”Once the links and metadata are fixed, we can move on to checking if the new site performs well enough to launch. We did this by editing our scan to include running performance health checks via Lighthouse to surface issues before the site goes live.
Pay close attention to Lighthouse results if the migration introduced a new framework, asset pipeline, or CDN configuration — these changes can quietly impact load times. If you are not familiar with Lighthouse, we have a guide on how to use Lighthouse audits for website performance scores.
Fix any issues directly in the staging site, then move on to Step 2 once the scan results look clean.
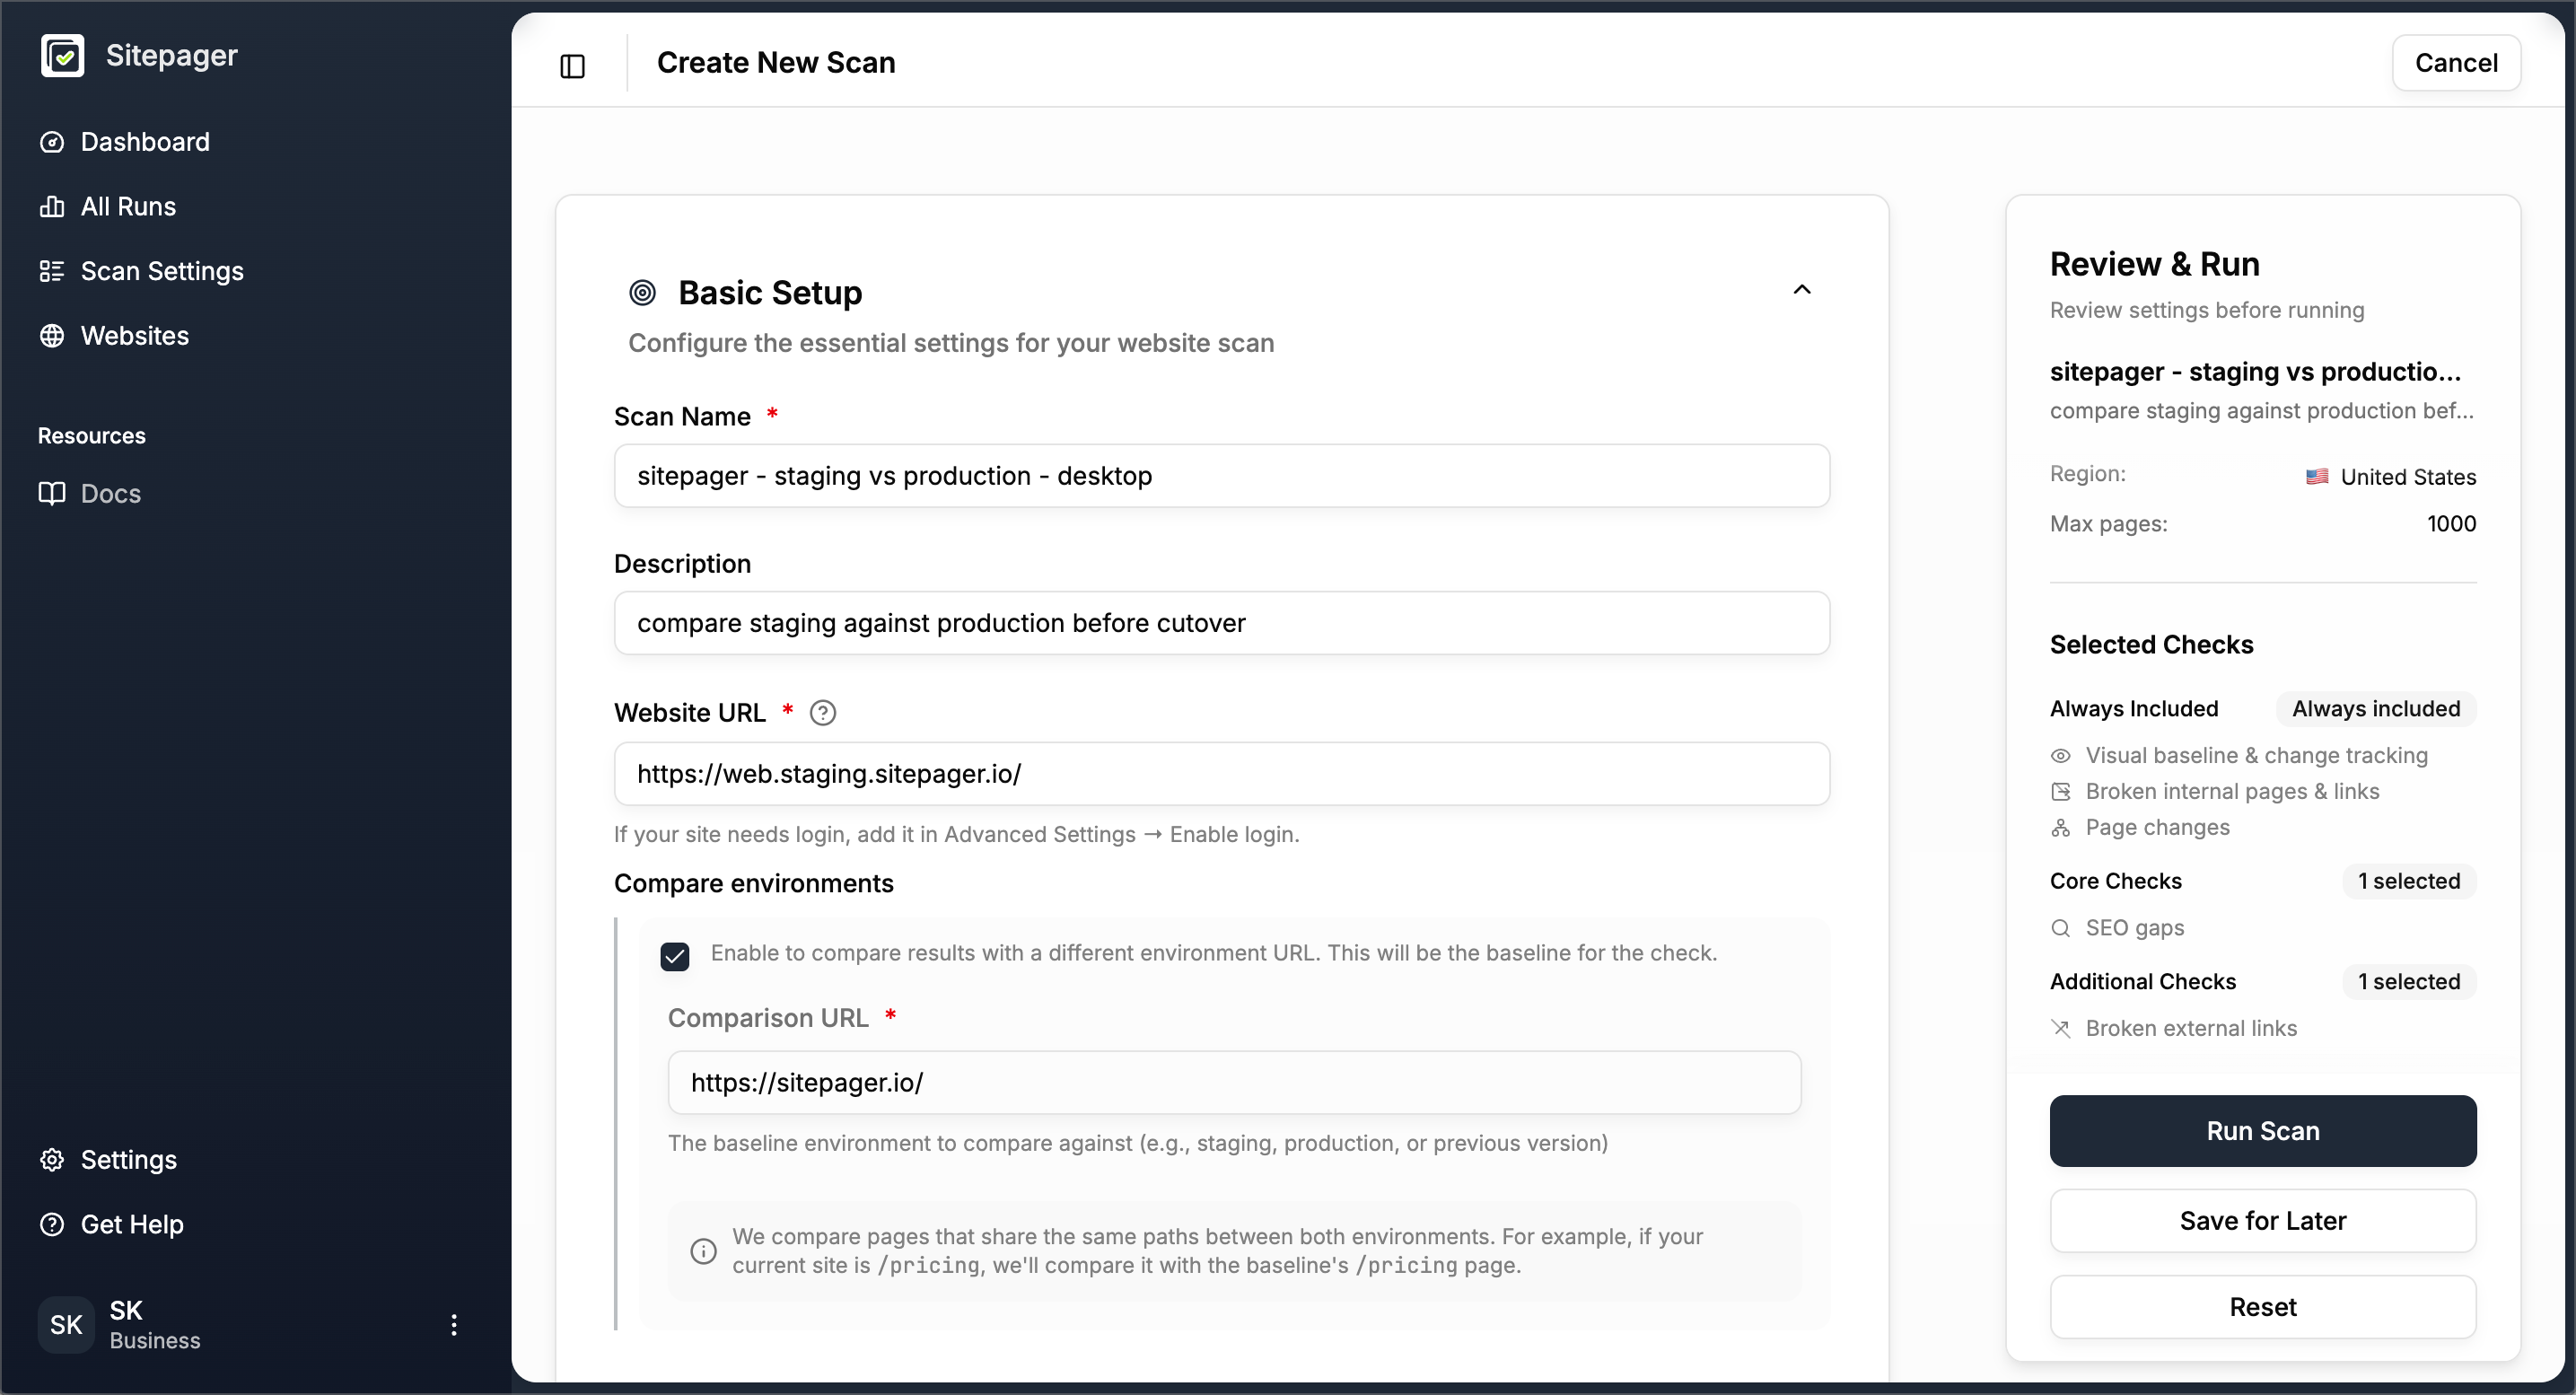
Step 2: Compare staging against the live site
Section titled “Step 2: Compare staging against the live site”Once staging is clean, add the live site as the comparison environment. This tells Sitepager to crawl both versions and surface every difference between them.
- Create a new scan using your staging URL
- Check Compare environments
- Enter your current live site URL as the comparison
- Click Run Scan
What to look for:
Does it look right visually?
Section titled “Does it look right visually?”The visual diff shows layout differences between the staging and live versions of each page. Changes appear in a side-by-side or overlay view so you can quickly see what has changed.
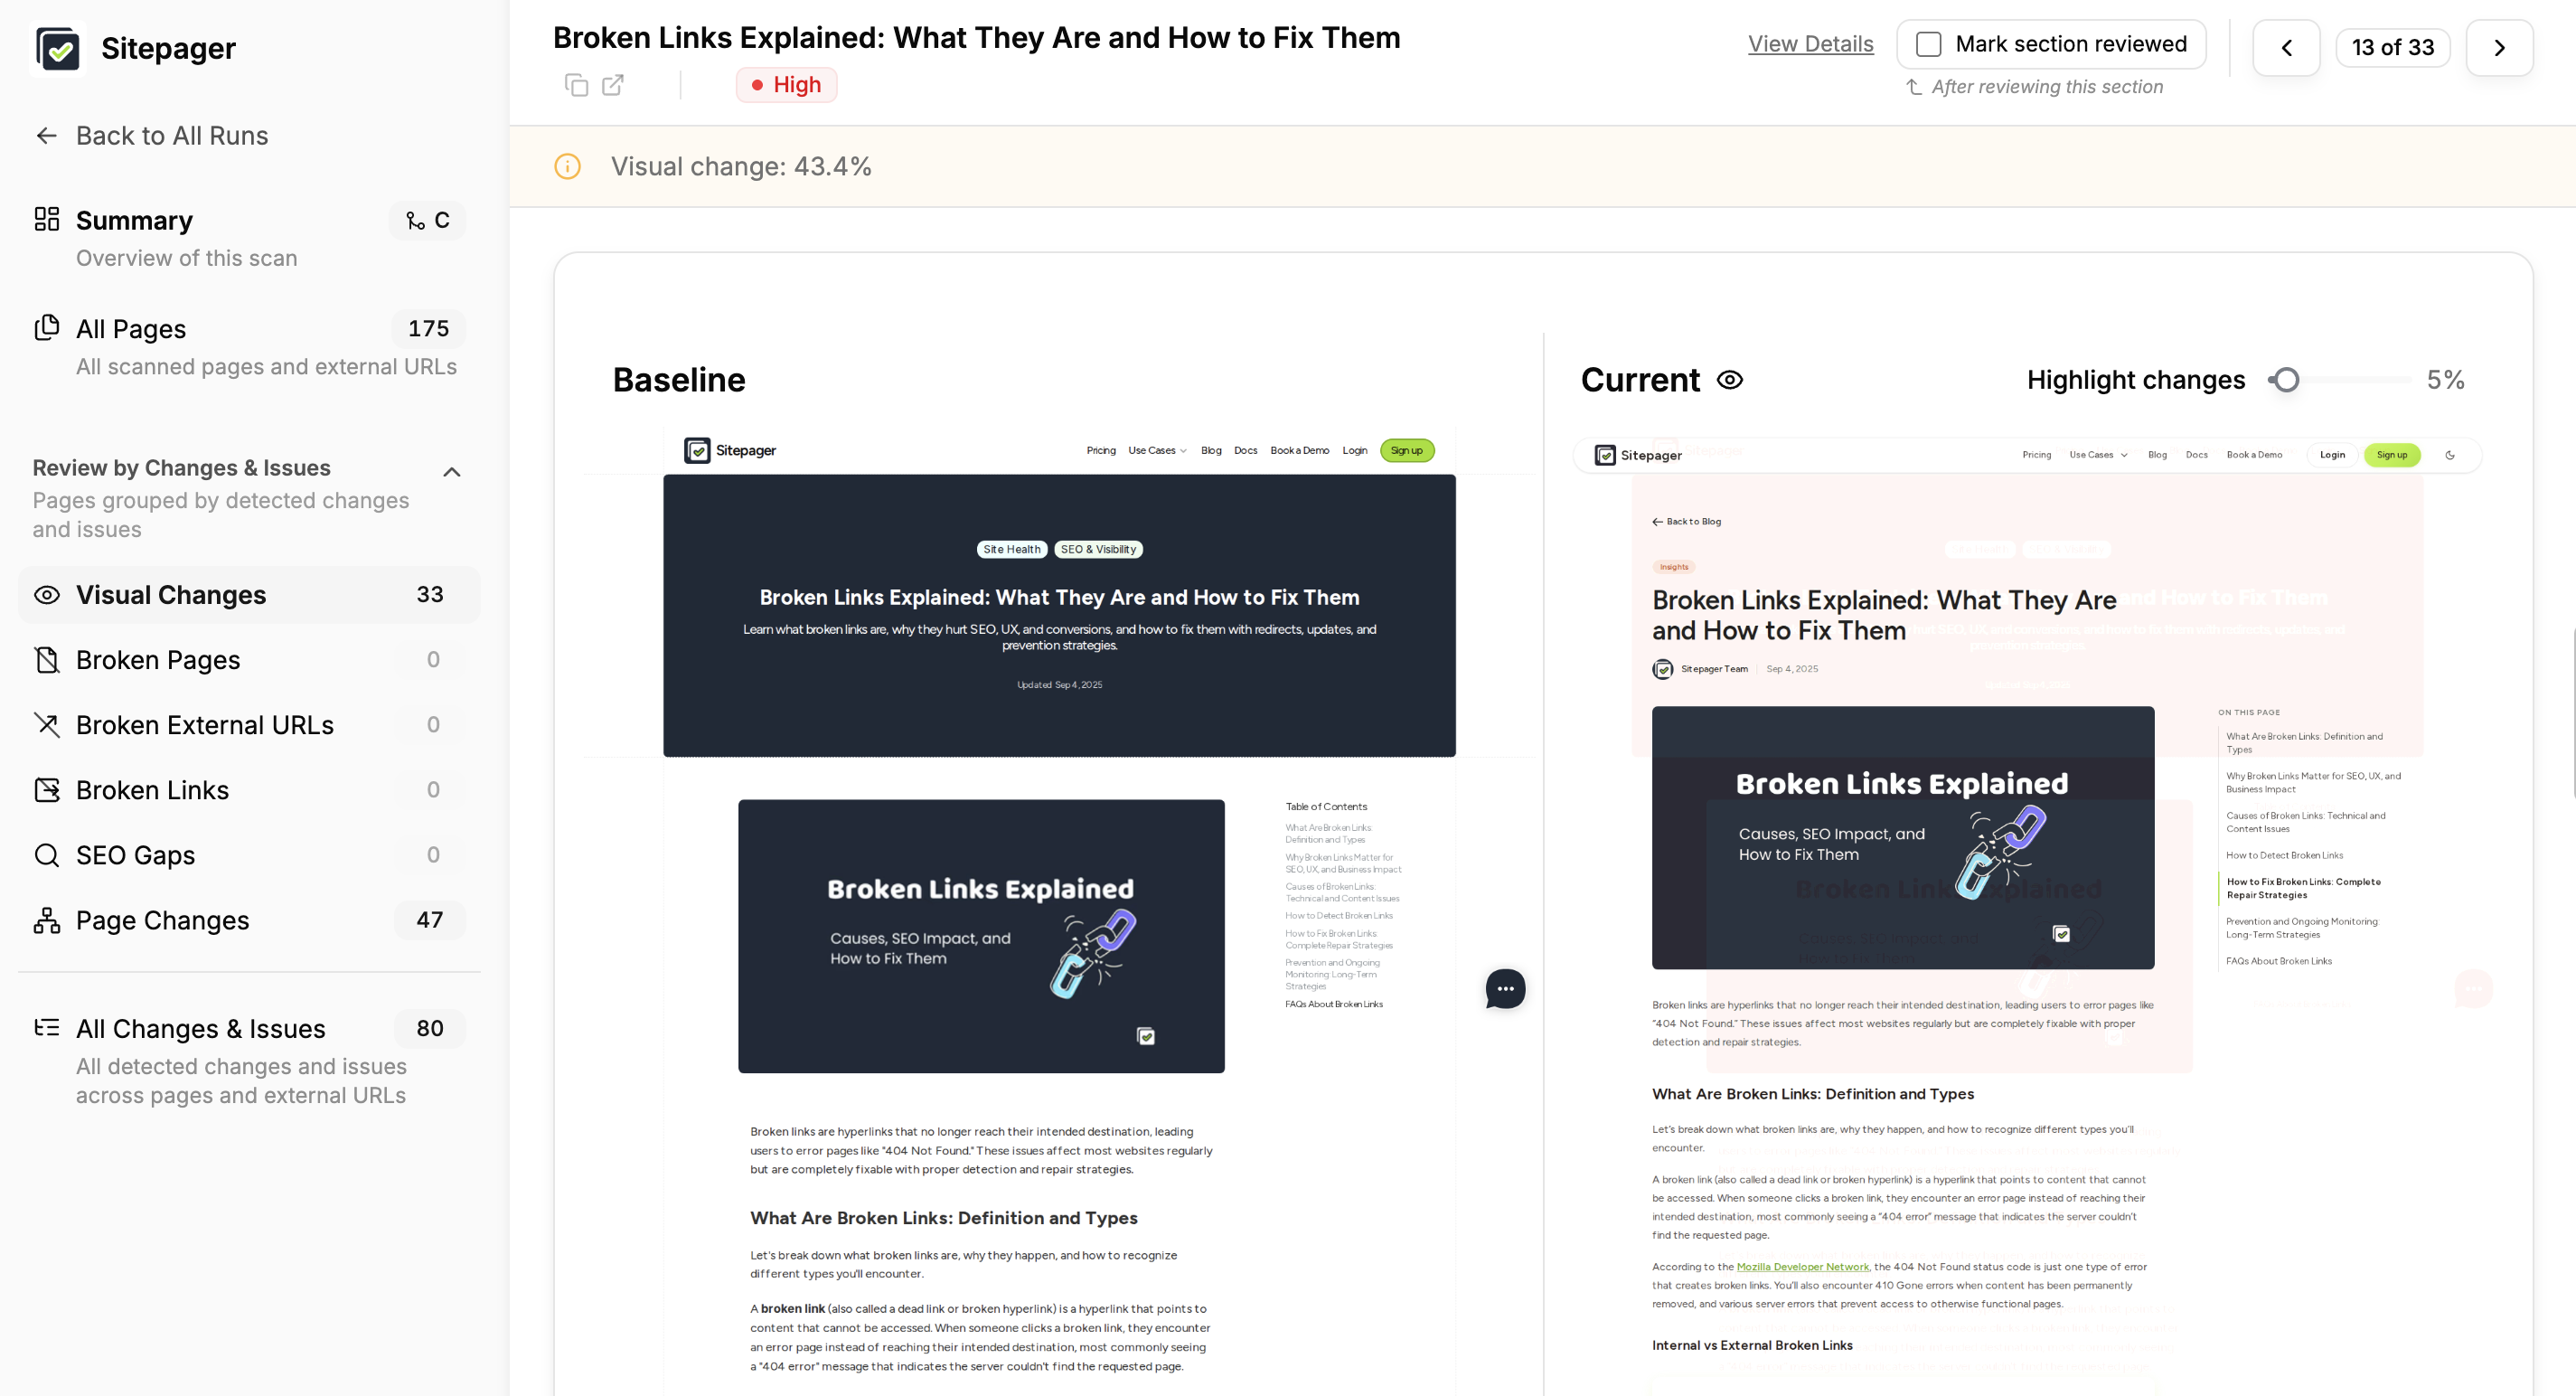
During a redesign, many visual changes are intentional. Use the diff to review the new layout and confirm that the changes you introduced render correctly across pages.
Look for things like:
- Elements shifting unexpectedly
- Missing components or images
- Spacing or alignment that looks off
In our migration, the visual diff made it easy to confirm the redesigned layout looked right across the site. It also caught a styling issue on one of our components that we had missed during manual review — the kind of thing that’s easy to overlook page by page but obvious in a side-by-side comparison.
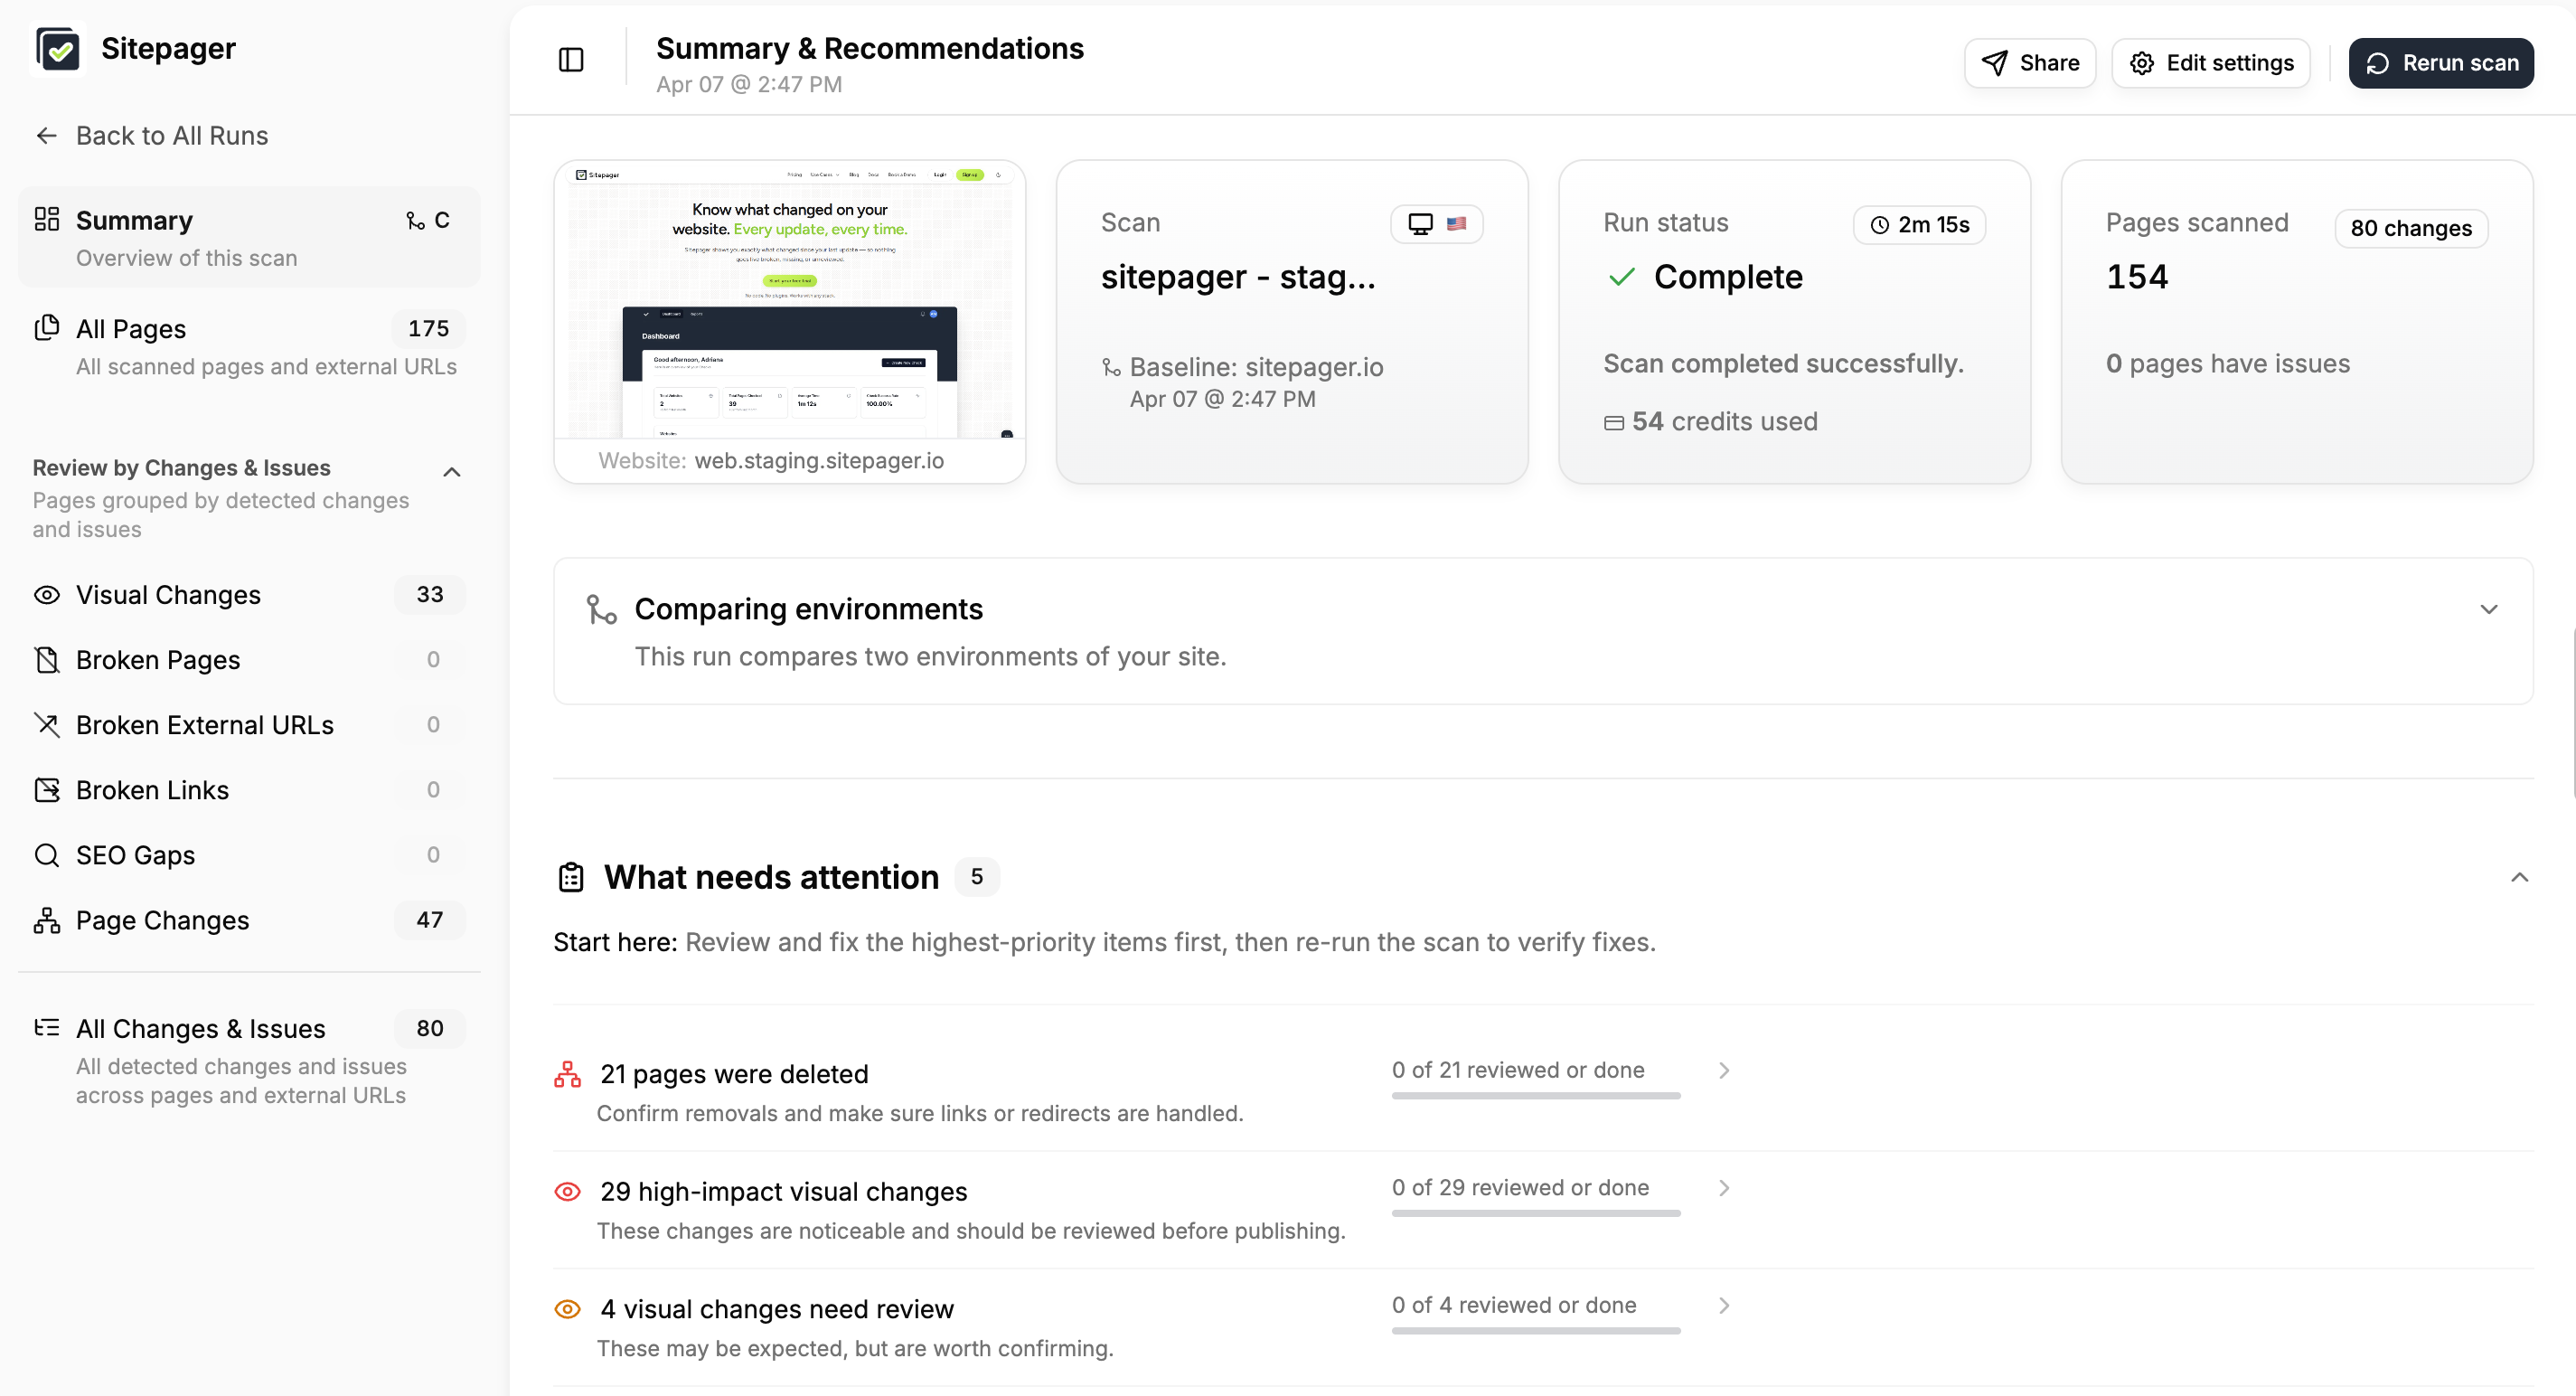
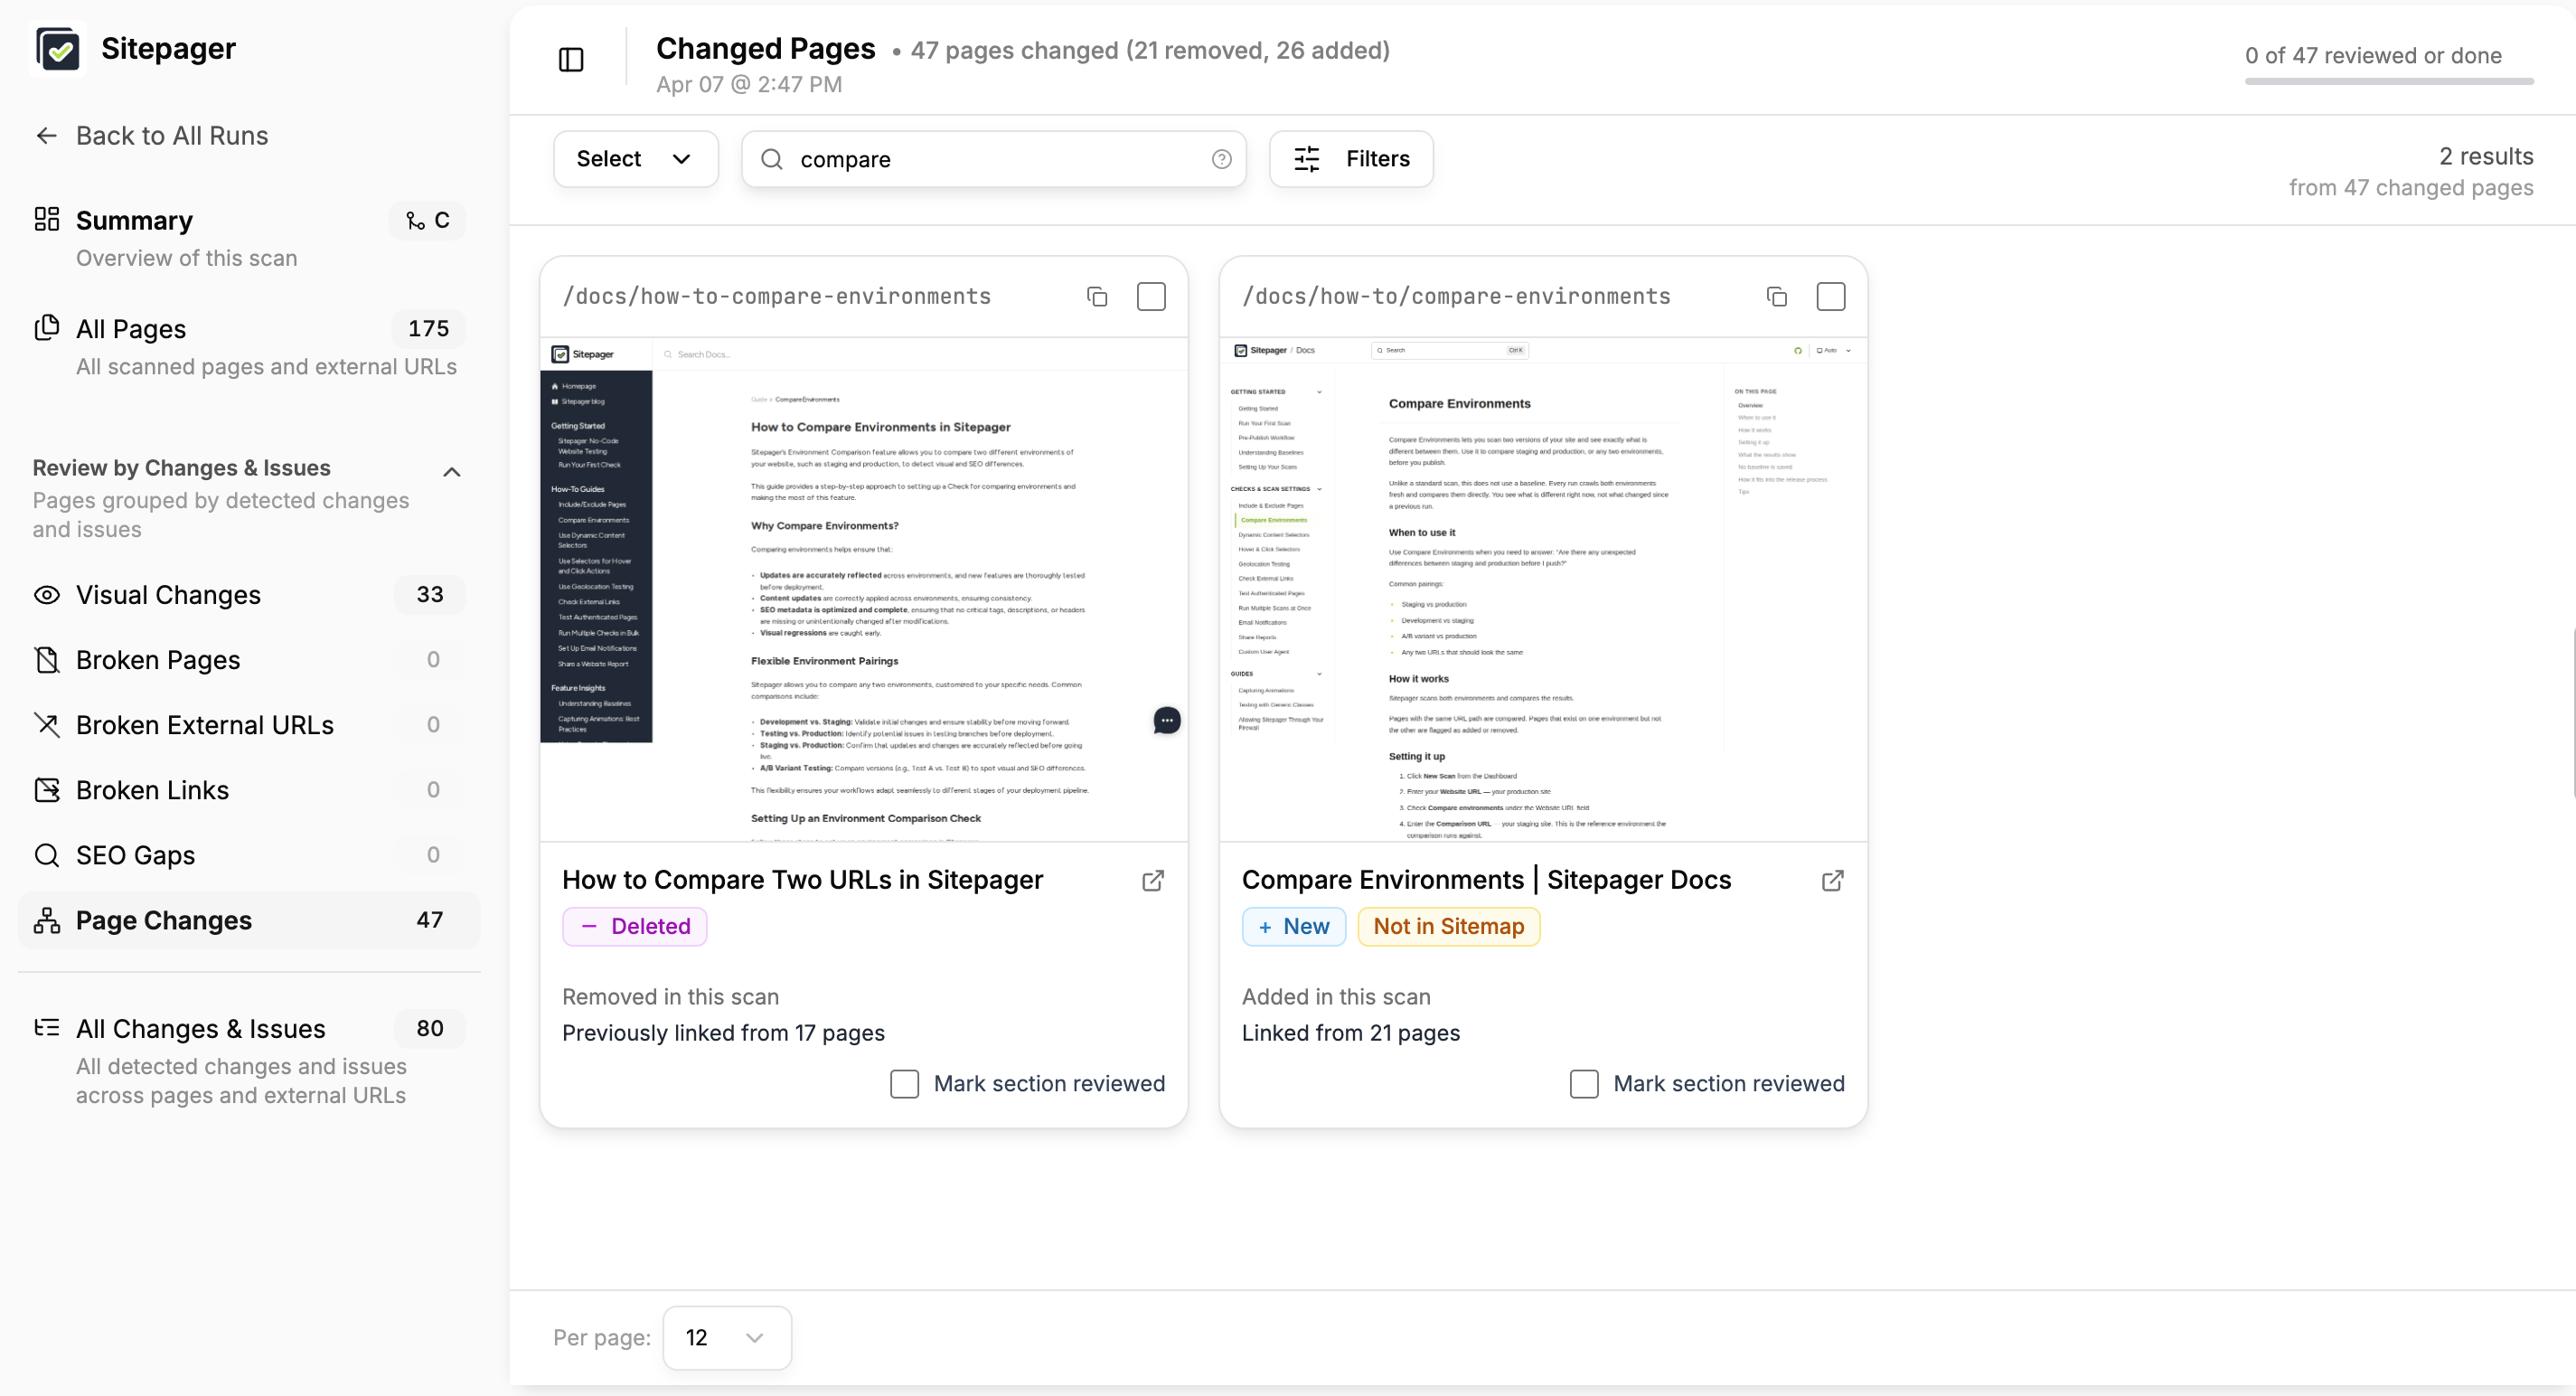
Did any pages get added or removed?
Section titled “Did any pages get added or removed?”The comparison shows which pages are new in staging and which ones from the live site are missing. Use this to confirm every addition is intentional and nothing important was dropped.
During our migration, we added several new pages and reorganized our documentation URLs — for example, /docs/how-to-compare-environments became /docs/how-to/compare-environments. In the comparison, the old URL showed up as deleted and the new one as added, making it easy to spot the change and confirm it was intentional.
Fix and re-run
Section titled “Fix and re-run”Fix the issues on staging, then re-run the comparison. Keep going until every remaining difference is intentional.
graph LR
  A[Scan] --> B[Review]
  B --> C[Fix]
  C --> A
We ran the comparison a couple of times — confirming page additions and URL changes were intentional, fixing old route references, and verifying visual changes looked as expected — before everything came back clean.
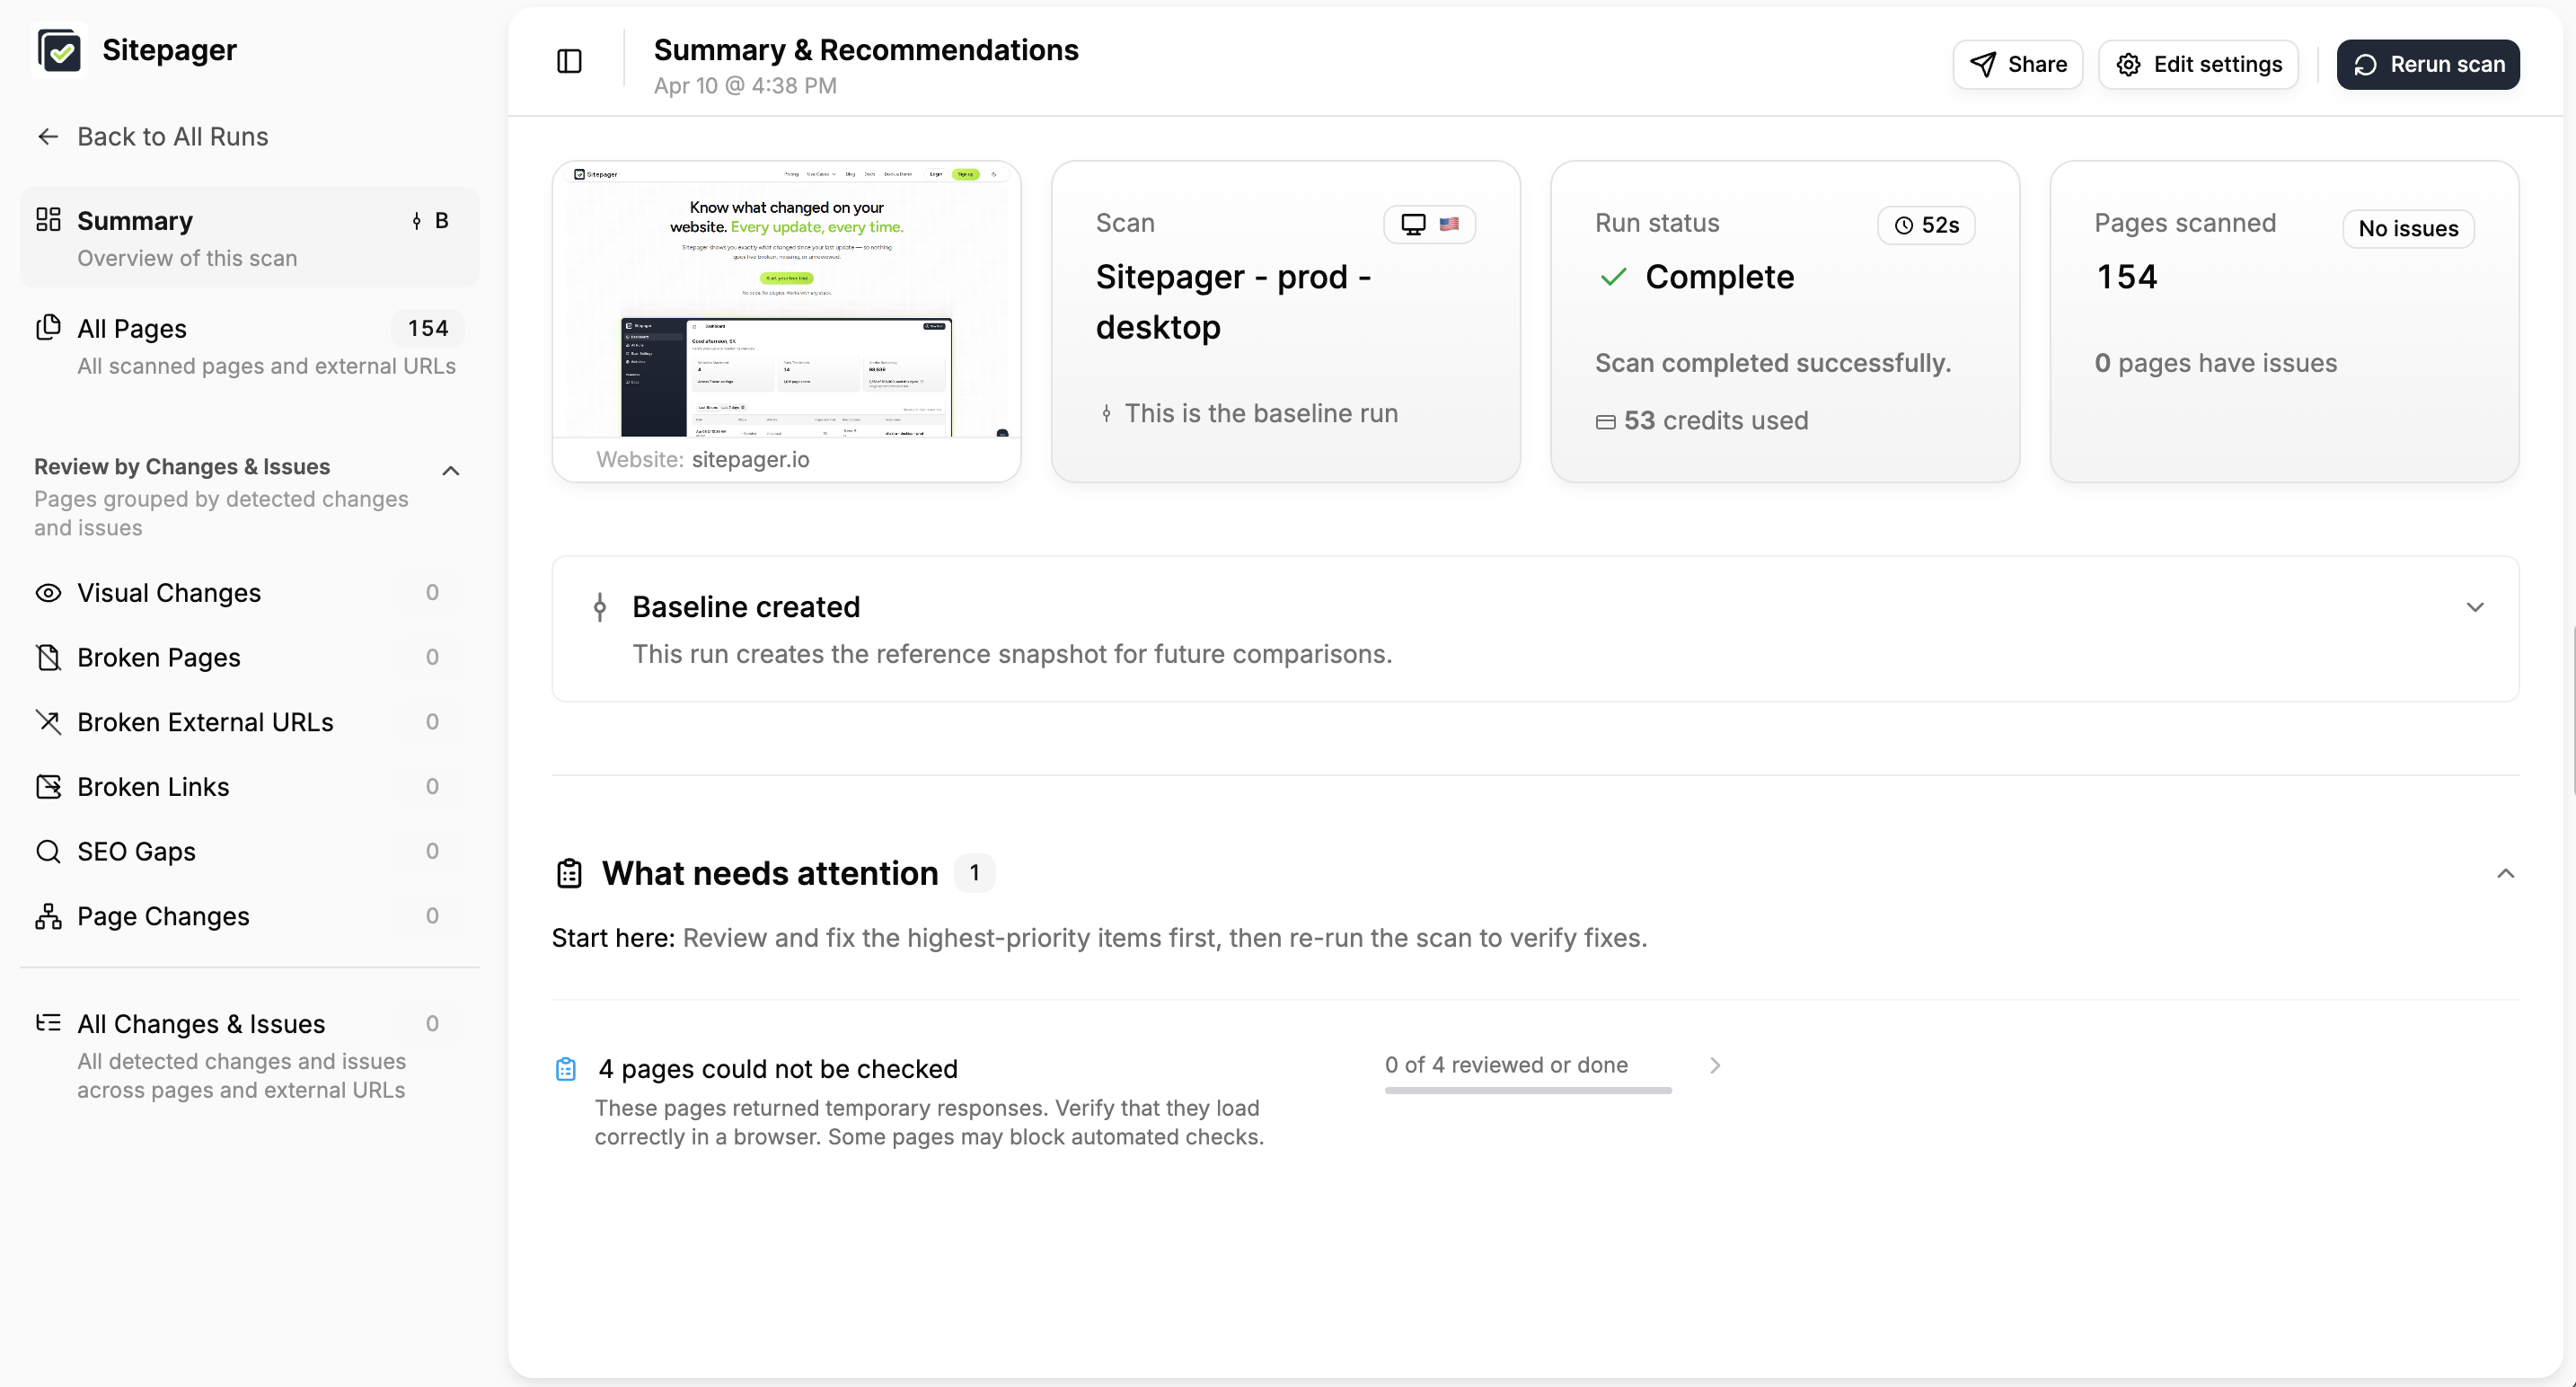
Step 3: Go live and confirm everything landed correctly
Section titled “Step 3: Go live and confirm everything landed correctly”By this point, you should feel confident about what’s changing and why. You’ve reviewed the redesigned pages, fixed broken links and metadata, and confirmed the site behaves as expected on staging.
Before you deploy, create a new scan using your current production URL. This captures the live site as it is now, before anything changes.
Next, publish the latest changes to your live site.
Once the new version is live, run this production scan again. The results will show you exactly what changed in production — confirming the deployment landed correctly.
Use the results to verify two things.
Pages render correctly. Review the screenshots and confirm the live site matches what you saw on staging. If anything looks off, the deployment introduced an issue — fix it and re-run.
Redirects are working. If you changed any URLs during the migration, filter by redirects in the All Pages view. Every old URL should point to its new destination. Problems here often go unnoticed until Google Search Console reports a spike in 404s or users hit broken bookmarks — catching them now saves you that headache.
One thing Sitepager won’t cover: analytics and tracking. GA4, Meta Pixel, and other tracking scripts can silently break during a platform change even when the site looks fine. Verify your analytics setup separately before or right after launch.
Step 4: Set a new baseline
Section titled “Step 4: Set a new baseline”Once the live site looks clean, create a fresh scan on the production URL. This gives you a clean slate — no redirect history, no deleted pages from the migration, no comparison runs. Just the live site as it is now, ready to build on.
The first run becomes your new baseline. Every future scan compares against it. You can read more about how baselines work in our Understanding Baselines guide.
Ideally, the results come back clean. If you have external link checks enabled, you may see a few pages flagged as “could not be checked” — this means those pages returned a temporary response or blocked the automated request. It doesn’t mean something is broken. In our case, they were all external URLs blocking automated checks. Opening them in a browser confirmed they loaded fine.
Your new site is live and your baseline is set. From here, re-run the scan before every future update to catch issues before they reach your users.
Depending on your site
Section titled “Depending on your site”The steps above apply to every migration. Depending on your site, a few additional checks are worth running.
Interactive elements Dropdowns, modals, accordions, and tabs often break during a platform change. Add hover and click selectors to your scan so Sitepager captures their activated states. If your mobile nav behaves differently, run a separate mobile scan to cover those interactions. → Hover and Click Selectors
Authenticated pages Member areas, customer portals, or gated content can break entirely during a migration. Set up login testing so Sitepager authenticates before scanning and captures what logged-in users actually see. → Test Authenticated Pages
Regional versions If your site serves different content by location — language versions, compliance banners, regional pricing — run a geolocation scan for each region. Migrations can break redirect logic or geo-detection without it showing up in a standard scan. → Geolocation Testing