Scan, Fix, Verify with AI
Use Sitepager and your AI assistant to find and fix issues on any website.
Sitepager scans your published site and identifies issues such as broken links, missing metadata, structural problems, and visual differences against the baseline. Your AI assistant reads these results, proposes fixes, and applies them to your site or codebase once you approve. After publishing the changes, you run the scan again to verify the issues are resolved.
This guide walks through the full workflow from scan to fix to verification.
Your assistant proposes. You approve. Nothing changes on your site without your review.
Quick answer
Section titled “Quick answer”Connect the Sitepager MCP server to your AI assistant. Then follow this loop:
- Run a Sitepager scan
- Ask your assistant to review the issues
- Ask your assistant for a fix plan
- Review and approve the plan
- Your assistant applies the fixes
- Publish your changes
- Run the scan again and verify
Requirements
Section titled “Requirements”Before starting, make sure you have:
- A Sitepager account with a scan configured for your site
- The Sitepager MCP server connected to your AI assistant
- An AI assistant that supports MCP (Claude Desktop or Claude Code recommended)
If you have not connected the Sitepager MCP yet: → Connect Sitepager to Your AI Assistant
How Sitepager and your AI assistant work together
Section titled “How Sitepager and your AI assistant work together”Sitepager and your AI assistant handle different parts of the workflow.
Sitepager scans your published site and surfaces:
- Broken internal and external links
- Missing metadata or headings
- Missing image alt text
- Visual differences against the baseline
- Pages added or removed since your last scan
Your AI assistant reads these results and proposes fixes. With a platform MCP such as Webflow MCP, or with access to your codebase, it can apply those fixes directly to your site.
Your assistant reads Sitepager scan results, proposes fixes, and applies approved changes. You remain in control of every step.
The workflow
Section titled “The workflow”Each step in the loop has a specific job. Here is the full sequence before we walk through it:
flowchart TD
  A[Run scan] --> B[Review issues]
  B --> C[Plan & approve fixes]
  C --> D[Apply fixes]
  D --> E[Publish]
  E --> F[Verify]
  F -->|Clean| G[Set new baseline]
  F -.->|Issues remain| B
Step 1: Run a scan
Section titled “Step 1: Run a scan”Run your scan from the Sitepager dashboard. Wait for it to complete.
You can also ask your assistant to trigger it:
Step 2: Review the issues
Section titled “Step 2: Review the issues”Ask your assistant to summarize what the scan found.
Your assistant reads the results and returns a prioritized breakdown. It tells you what issues were found, which pages are affected, and which fixes will have the most impact.
Start with the highest-impact issues first.
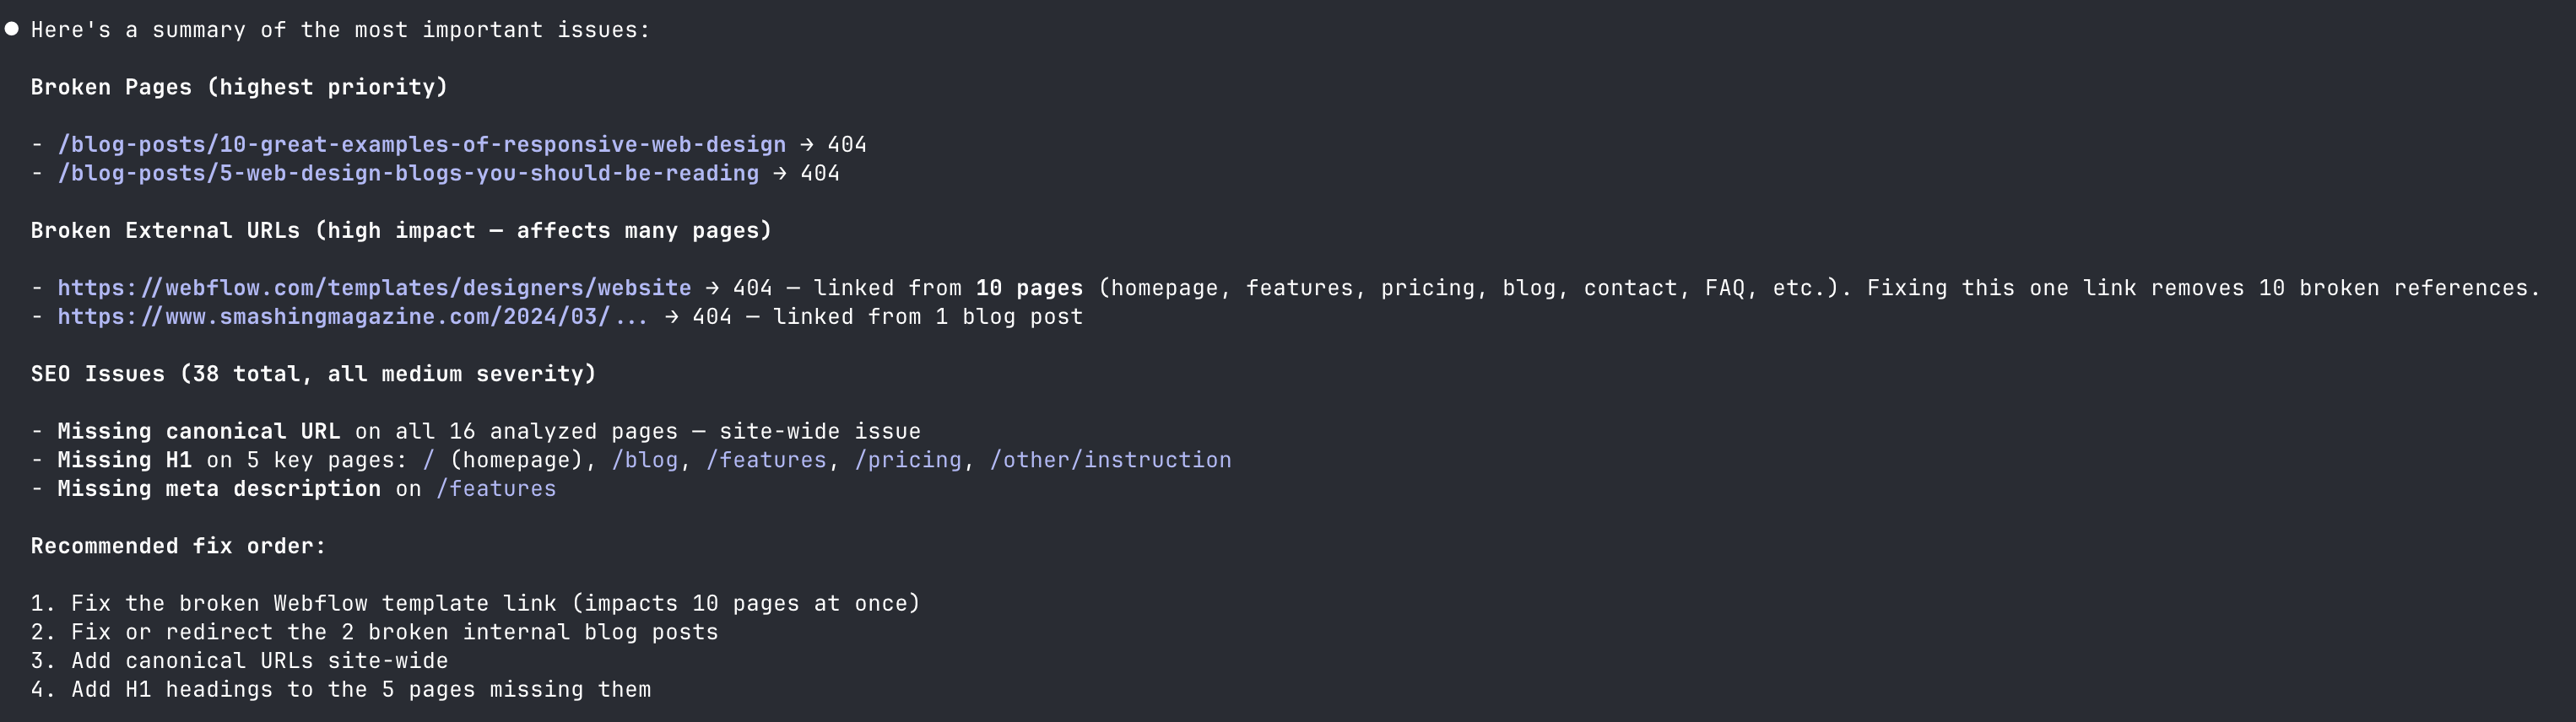
Read through the full summary before moving on. This is your chance to understand what is wrong before anything is touched.
Step 3: Ask for a fix plan
Section titled “Step 3: Ask for a fix plan”Before fixing anything, ask your assistant to show you exactly what it will change.
Your assistant produces a detailed plan covering the current state, the proposed change, and where it will be applied.
Work through issues section by section. If the number of issues is small, reviewing everything in one plan is fine. For larger sites or scans with many issues, scope the plan to one issue type at a time. Ask for a plan, review and apply it, publish and verify, then move to the next. This keeps each review focused and makes it easier to catch anything unexpected.
Step 4: Approve and refine
Section titled “Step 4: Approve and refine”Once you have reviewed the plan, confirm what you want your assistant to proceed with.
You can approve the plan as-is, adjust specific items before proceeding, or write the copy yourself and ask your assistant to apply your exact values. Your assistant will not make any changes until you give the go-ahead.
Step 5: Apply the fixes
Section titled “Step 5: Apply the fixes”Your assistant applies the approved fixes. Where the fixes land depends on how your site is built:
- Platforms with an MCP server like Webflow. Fixes are applied directly to the site through the MCP. If your site is on Webflow, there are additional prompts and steps specific to the Webflow workflow. See Fix Webflow Issues with AI.
- Codebase-managed sites like Next.js, Astro, React, static sites, and AI-maintained sites. Your assistant edits the files in your repo directly.
Once complete, your assistant confirms what was applied.
Step 6: Publish your changes
Section titled “Step 6: Publish your changes”Review the changes before publishing. How you publish depends on your setup. You can deploy from your repo, publish from a CMS designer, or push your changes live however your team normally does.
Step 7: Run the scan again
Section titled “Step 7: Run the scan again”Once your changes are live, run the scan again.
Your assistant triggers a new run and waits for it to finish.
Step 8: Verify the fixes
Section titled “Step 8: Verify the fixes”Sitepager runs the comparison automatically. Your assistant reads the result and surfaces what was fixed, what remains, and whether anything new appeared.

If issues remain, go back to step 3 and repeat for the next issue type.
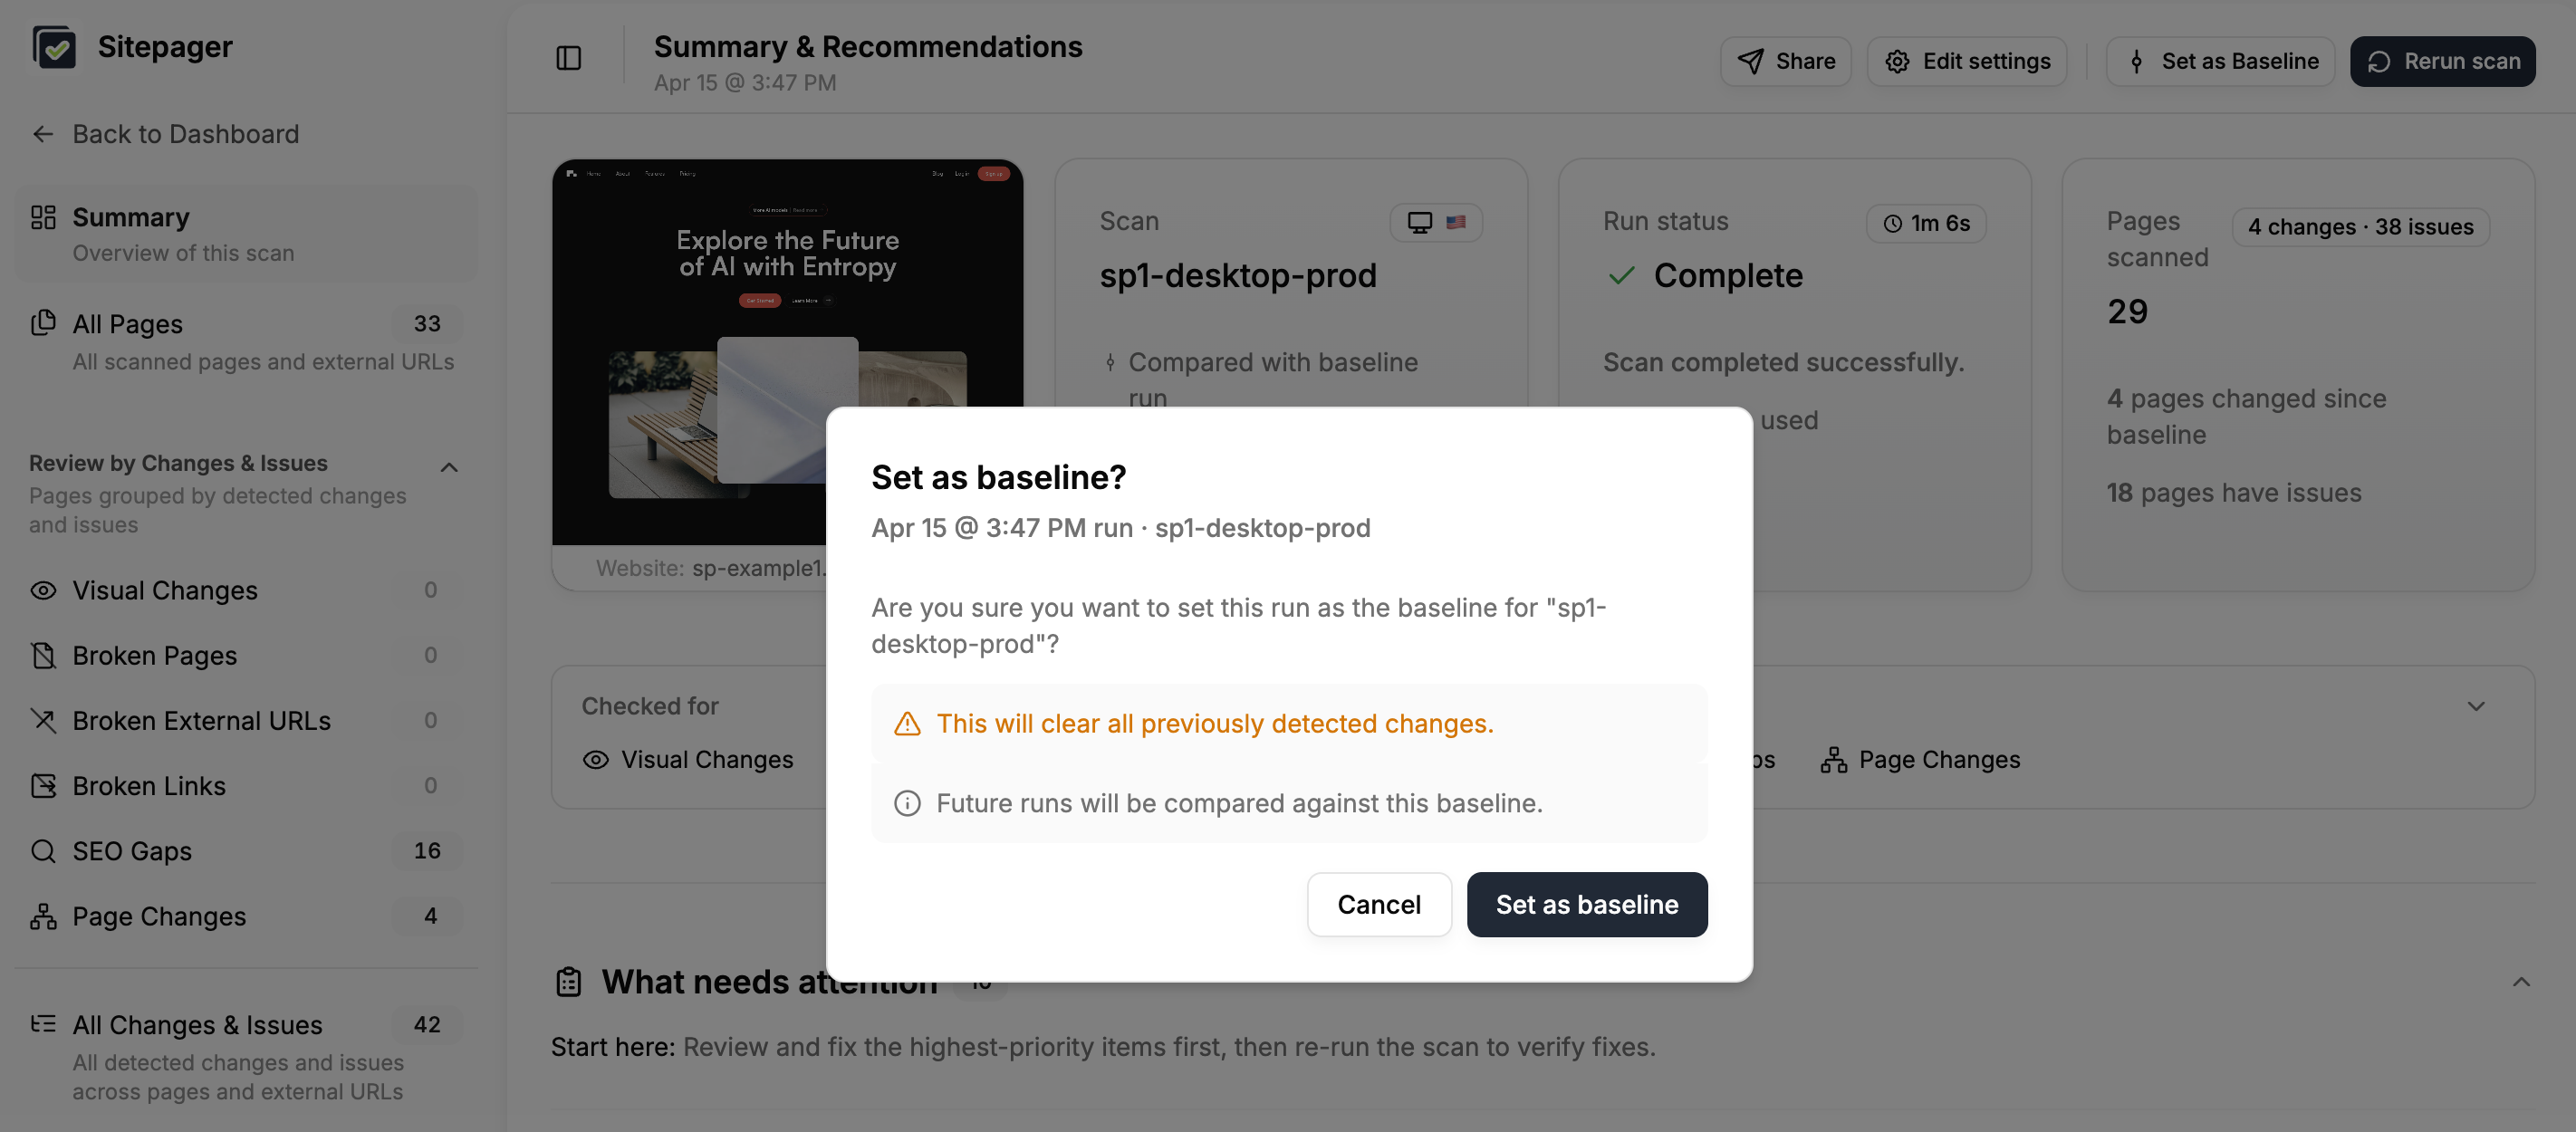
Step 9: Set a new baseline
Section titled “Step 9: Set a new baseline”Once the scan comes back clean and you are happy with the result, update your baseline in the Sitepager dashboard. This makes the clean scan the new reference point for every future update.
Baseline updates are not currently available via MCP and need to be done from the dashboard.
Running the full loop in one prompt
Section titled “Running the full loop in one prompt”If your site is maintained by an AI assistant with access to your codebase, such as Claude Code or Cursor, you can run the entire loop with a single prompt:
Your assistant reads the scan, plans the fixes, pauses for approval, applies them, triggers the re-run, and verifies the result end to end.
Closing the loop
Section titled “Closing the loop”Once the fixes are applied, the follow-up scan verifies the result and confirms that the issues are resolved.
At this point the workflow is complete:
Scan → review → plan → approve → fix → publish → verify.
From here, the same loop becomes part of your normal workflow. Run a scan whenever you make updates, review the results, and fix issues before they reach visitors.
Over time this turns website maintenance into a repeatable process instead of manual spot-checking across pages.
Beta feedback
The AI + MCP workflow is currently in beta.
If something doesn’t behave as expected or you have ideas for improving the workflow, send us a note at support@sitepager.io or through the in-app chat. Feedback during beta helps us improve the automation and documentation.